

The moment I flipped over a loaf of Wonder Bread and read the ingredient list, I knew I had to find a better way, and this 6-ingredient recipe was everything I was looking for.
Over 30 ingredients. Calcium propionate. Potassium bromate. DATEM. I couldn’t even pronounce half of them, and this was the bread I was using to make my family’s sandwiches.
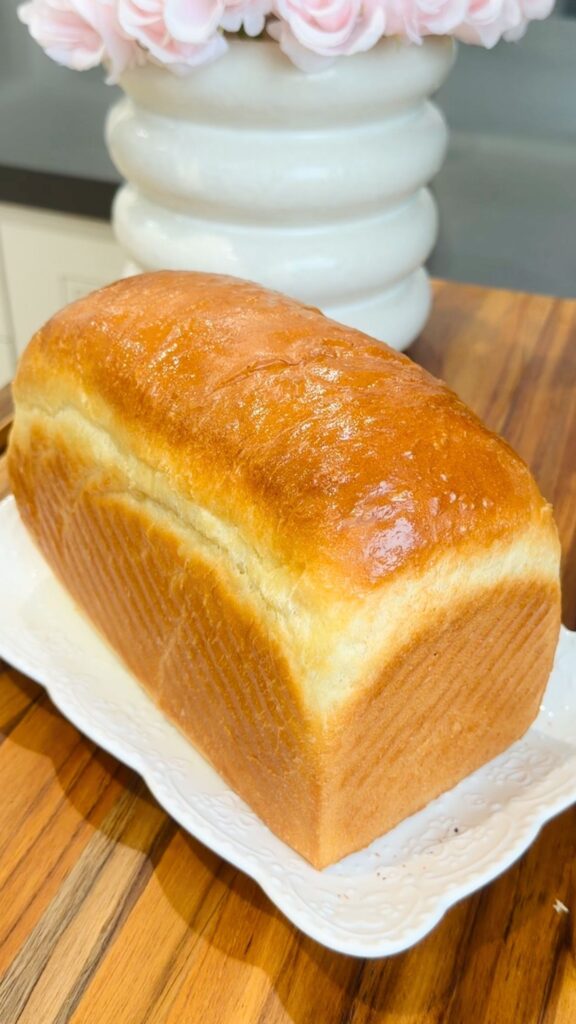
So I got to work. What I landed on is a soft, pillowy white loaf that nails the exact texture of the original, with just 6 simple pantry ingredients and about 20 minutes of actual hands-on work.
TABLE OF CONTENTS
Why This Homemade Wonder Bread Recipe Works
This isn’t just another white bread loaf recipe. It’s SPECIFICALLY designed to recreate that iconic soft, squishy sandwich bread texture, without a single preservative in sight.
No stand mixer required. Done entirely by hand in about 10 minutes of kneading. Most of the total time is completely hands-off while the dough rises, which means you can go live your life while your bread does its thing.
Here’s what makes this recipe worth making:
- 6 simple ingredients you already have in your pantry
- No stand mixer required, kneaded entirely by hand
- About 20 minutes of active work, the rest is hands-off rising time
- Costs roughly $0.47 per loaf versus $3.49 at the grocery store
- Beginner-friendly, no prior bread-baking experience needed
- Soft enough for school sandwiches, sturdy enough for a loaded grilled cheese
One of my favourite foods is a buffalo chicken grilled cheese, and I used to always buy soft sandwich breads like Wonder Bread to make it with. The day I made this recipe for the first time and used it for that grilled cheese, I knew I would never go back.
I BETTER NOT CATCH YOU buying Wonder Bread from the store after you read this. You have EVERYTHING you need to make this at home.
Homemade Wonder Bread vs. Store-Bought: The Real Difference
Let’s talk about what’s actually in your bread.
Your homemade Wonder Bread uses just 6 ingredients: flour, yeast, sugar, salt, milk, and butter. A store-bought loaf lists calcium propionate, potassium bromate, DATEM, monoglycerides, and other dough conditioners. These are there to extend shelf life and improve texture artificially, things your homemade version achieves naturally through milk and butter.
The cost difference is just as striking. A homemade loaf costs roughly $0.47 to make. A store-bought loaf runs about $3.49. If your family goes through two loaves a week, that’s a saving of over $300 per year.
And the taste? Fresh, real, and homemade wins every single time.
What You’ll Need

Ingredients
3 cups all-purpose flour: The base of your loaf. All-purpose flour gives you the right structure for a soft, tender crumb without being too dense.
2 tsp instant yeast: Instant yeast is the key to a reliable, consistent rise. I recommend instant over active dry for this white bread loaf recipe because it doesn’t need to be proofed separately, saving you time.
2 tbsp sugar: Sugar feeds the yeast for a strong rise and adds a subtle sweetness that gives this bread its familiar, lightly sweet flavour.
1 tsp salt: Salt controls yeast activity and enhances overall flavour. Don’t skip it.
1 cup warm milk: This is the secret to that pillowy, soft texture. Milk adds fat and protein to the dough, which creates a more tender crumb than water alone.
4 tbsp unsalted butter, melted: Butter adds richness, moisture, and the subtle flavour that makes this taste like real sandwich bread and not a plain, flat loaf.
Equipment
- Large mixing bowl
- Wooden spoon
- Measuring cups and spoons
- 9×5 inch loaf pan
- Parchment paper
- Wire cooling rack
- Plastic wrap or a clean kitchen towel
How to Make Homemade Wonder Bread (Step-by-Step)
Minoo’s Pro Tip: Room temperature ingredients blend more easily. Take your milk and butter out 30 minutes before starting. Warm milk should feel comfortable on your wrist, around 100 to 110°F. Never hot.
Step 1: Mix the dry ingredients
In a large bowl, whisk together 3 cups of flour, 2 tsp of instant yeast, 2 tbsp of sugar, and 1 tsp salt until well combined. This takes about 30 seconds.

Step 2: Add the wet ingredients
Add 1 cup of warm milk and 4 tbsp of melted butter to the dry ingredients. Mix with a wooden spoon until a shaggy dough forms and no dry flour remains. The dough will look rough and messy at this point. That’s EXACTLY right.

Step 3: Knead the dough
Turn the dough onto a lightly floured surface and knead by hand for 8 to 10 minutes, until smooth and elastic. You’re looking for a texture that feels soft and slightly tacky, similar to an earlobe. Add small amounts of flour ONLY if the dough is too sticky to handle.
Minoo’s Pro Tip: To knead, push the dough away from you with the heel of your hand, fold it back over itself, turn it a quarter turn, and repeat. After 8 to 10 minutes, the dough should spring back slowly when you poke it.

Step 4: First rise
Place the dough in a lightly greased bowl, turning once to coat. Cover with plastic wrap and let rise in a warm spot for 1 to 2 hours, until doubled in size.
Minoo’s Pro Tip: For a warm rising environment, place your covered bowl in the oven with just the oven light on. Don’t turn the oven on. Or warm a cup of water in the microwave for 2 minutes, then place your dough bowl inside the microwave with the cup of hot water. The trapped warmth creates the perfect rising spot.

Step 5: Shape the loaf
Gently deflate the dough and transfer it to a lightly floured surface. Pat into a rectangle about 8 inches wide, then roll tightly into a log, pinching the seam firmly closed.

Step 6: Second rise
Place the loaf seam-side down in a parchment-lined loaf pan. Cover loosely and let rise for 1 hour, until the dough domes about 1 inch above the pan’s rim.
Minoo’s Pro Tip: Don’t rush the second rise. That dome above the rim is your signal that the bread is ready to bake. If your loaf goes into the oven too flat, you’ll end up with a dense result.

Step 7: Bake
Bake at 350°F (175°C) on the lower rack for 30 to 35 minutes, until the top is a deep golden brown and the loaf sounds hollow when tapped on the bottom.
Minoo’s Pro Tip: Over-browning the top is one of the most common mistakes with this recipe. If you see the top getting too dark before the bread is done, loosely tent a piece of aluminum foil over it and continue baking. This stops the browning without interrupting the cook.
Step 8: Cool before slicing
Remove from the pan immediately and cool on a wire rack for at least 30 minutes before slicing. Cutting too early will compress the crumb and you’ll lose that soft, airy texture you worked hard for.

How to Know It’s Done
The top should be deep golden brown, not pale yellow. When you tap the bottom of the loaf, it should sound hollow, not dense and dull. If you have an instant-read thermometer, the internal temperature should read around 190 to 200°F.
How to Store Your Homemade Wonder Bread

Room temperature: Store in an airtight bag or bread box for up to 3 days. The milk and butter in this recipe help it stay soft and moist longer than you’d expect from a preservative-free loaf.
Freezer: Slice the loaf before freezing for convenience. Wrap tightly in plastic wrap and store in a freezer bag for up to 3 months. Pull out slices as needed and toast straight from frozen.
To revive a frozen loaf, thaw overnight at room temperature still wrapped, then warm in the oven at 300°F for 10 minutes.
Fun Variations to Try
Once you’ve mastered this white loaf bread recipe, here are the variations I love most.
Cheese Bread: After patting the dough into a rectangle at the shaping stage, scatter 1 cup of shredded sharp cheddar over the surface before rolling it into a log. The result is a golden, savoury loaf that is INCREDIBLE toasted.
Cinnamon Raisin Bread: Add 1 tsp cinnamon and 1/2 cup raisins to the dry ingredients before mixing. This variation makes the most amazing French toast you’ve ever had.
Lemon Blueberry Bread: Add the zest of one lemon and 1/2 cup of fresh or frozen blueberries when you add the wet ingredients. It’s sweet, fragrant, and perfect for morning toast.
Serving Ideas

This sandwich bread recipe is built for sandwiches, but it goes well beyond that.
Classic PB&J: Soft white sandwich bread and peanut butter and jelly is a combination that doesn’t need improving. This loaf makes it perfect.
Grilled cheese: This is how the recipe started for me. A buffalo chicken grilled cheese on fresh homemade bread is something else entirely.
Toast: Slice it thick, toast it golden, and add butter and honey. Simple and so satisfying.
School lunch sandwiches: This is what makes this recipe worth it for families. Soft, kid-approved, no mystery ingredients in your children’s lunches.
French toast: Day-old bread works beautifully here. The soft crumb soaks up the egg mixture perfectly.
If you love low-effort bread recipes, my No-Knead 5-Ingredient Sandwich Bread is another favourite in this house that requires almost zero hands-on work.
Troubleshooting Your Wonder Bread
The bread is dense and heavy. This usually comes down to too much flour worked in during kneading, dough that didn’t rise long enough, or yeast that was past its best. Check your yeast’s expiration date first. And resist adding extra flour unless the dough is truly impossible to handle. A slightly sticky dough always bakes up softer than an overly stiff one.
The bread didn’t rise. Check two things: was your milk above 115°F? Hot liquid kills yeast. Was your yeast fresh? Old yeast won’t activate properly. Use the warm oven trick for your rise environment if your kitchen runs cold.
The centre is gummy. Almost always from cutting too soon. Let the loaf cool for the full 30 minutes before slicing. A gummy centre can also mean the loaf needed a few more minutes in the oven.
The top browned too fast. Cover it with foil. Tent it loosely over the top of the loaf and continue baking until the interior is fully cooked.
The dough tears during shaping. Let it rest for 10 minutes before trying again. The gluten needs time to relax.
More Bread Recipes You’ll Love

If this wonder bread recipe has you excited about baking at home, here are five more to add to your list:
- Quick Sandwich Bread – Ready in just 1 hour. When you need sandwich bread fast, this is the one.
- Homemade Whole Wheat Bread – Same soft, pillowy texture, but with the added nutrition of whole wheat flour.
- Italian Sandwich Bread – A crusty outside with a soft interior for when you want something a little different.
- Easy Focaccia Bread Recipe – Just 5 ingredients. Perfect for beginners who want to explore after mastering this loaf.
- Traditional Swiss Braided Bread – Looks impressive on the table but uses the same beginner-friendly approach.
Let’s Get Baking!

This homemade wonder bread recipe is proof that you don’t need a long ingredient list, complicated techniques, or a stand mixer to bake incredible sandwich bread at home. Twenty minutes of work, a few hours of patience, and you’ll have the softest, freshest loaf you’ve ever tasted.
Your family will notice the difference. I promise.
Now get in that kitchen and make it happen! When you do, leave a rating below and let me know how it turned out. I read every single comment.


The Softest Homemade Wonder Bread Recipe You’ll Ever Make
EMAIL THIS RECIPE
Enter your email and I’ll send this directly to you.
Plus you’ll get new recipes from me every week!
Ingredients
- 3 cups all-purpose flour
- 1 cup warm milk
- 4 tbsp unsalted butter melted
- 2 tbsp sugar
- 1 tsp salt
- 2 tsp instant yeast
Instructions
- In a large bowl, whisk together 3 cups flour, 2 tsp instant yeast, 2 tbsp sugar, and 1 tsp salt until well combined.
- Add 1 cup warm milk and 4 tbsp melted butter, mixing with a wooden spoon until a shaggy dough forms and no dry flour remains.
- Turn dough onto a lightly floured surface and knead by hand for 8–10 minutes, until smooth and elastic. The dough should feel soft and slightly tacky, similar to an earlobe. Add small amounts of flour only if the dough is too sticky to handle.
- Place dough in a lightly greased bowl, turning once to coat. Cover with plastic wrap and let rise in a warm spot for 1–2 hours, until doubled in size.
- Gently deflate the dough and transfer to a lightly floured surface. Pat into a rectangle about 8 inches wide, then roll tightly into a log, pinching the seam firmly closed.
- Place seam-side down in a parchment-lined loaf pan. Cover loosely and let rise for 1 hour, until the dough domes about 1 inch above the pan's rim.
- Bake at 350°F (175°C) on the lower rack for 30–35 minutes, until the top is deep golden brown and the loaf sounds hollow when tapped on the bottom.
- Remove from pan immediately and cool on a wire rack for at least 30 minutes before slicing. Cutting too early will compress the crumb.
Notes
Need More Substitutions? Discuss With AI:
Nutrition
Want To Save This Recipe?
Share your email & we’ll send it over! PLUS, you’ll get new recipes from us weekly
Frequently Asked Questions
The original store-bought Wonder Bread contains over 30 ingredients, including wheat flour, water, sugar, yeast, soybean oil, and preservatives like calcium propionate and potassium bromate. This homemade version recreates the same soft texture with just 6 simple ingredients.
Yes. Dissolve 1 packet (2 1/4 tsp) of active dry yeast in 1/4 cup of the warm milk with a pinch of sugar. Let it stand 5 minutes until foamy, then proceed with the remaining milk and ingredients as written.
Usually caused by too much flour during kneading, under-risen dough, or expired yeast. Make sure your milk is warm but not above 115°F, your yeast is fresh, and the dough has risen fully before baking.
Store in an airtight bag at room temperature for up to 3 days. The milk and butter in this recipe help retain moisture naturally. For longer storage, slice and freeze for up to 3 months.
This recipe is DESIGNED for hand-kneading. No stand mixer needed at all. Knead by hand for 8 to 10 minutes on a lightly floured surface until smooth and elastic.
Milk adds fat and protein to the dough, which creates a much softer, more tender crumb. Water-based bread tends to have a chewier, crustier texture. For that classic, squishy wonder bread feel, milk is the key ingredient.
Yes. Any milk works, including oat milk, almond milk, or 2% dairy milk. Whole milk gives the richest result, but any variety will work in this sandwich bread recipe.
Absolutely. Slice the loaf before freezing for convenience. Wrap tightly in plastic wrap and store in a freezer bag for up to 3 months. Toast slices directly from frozen, or thaw overnight at room temperature.
Smooth, soft, and slightly tacky, similar to an earlobe. It should spring back slowly when you poke it. If it tears instead of stretching, it needs more kneading.
Yes. I recommend replacing no more than half the all-purpose flour with whole wheat for your first try. More than that will change the texture significantly and may result in a denser loaf.


Awesome recipe, made it my bread machine the dough cycle and baked it in a loaf pan.
So good and easy, so very good.
I haven’t been to the store for bread since i can’t remember when.
Thanks…
Mike this made me SO happy to read!! Not going back to store-bought bread is the ultimate win!! So glad you loved it!