
These healthier homemade Oreos prove you don’t need a chemistry lab full of preservatives and artificial ingredients to recreate your favorite childhood cookie.
I have this VERY specific memory from when I was little. I was eating an Oreo and my parents looked down at my hands, and they were covered in black food coloring. They were so horrified that they never let us have Oreos again. At the time, I thought they were being so uncool, but now I realize how lucky I was to have parents who cared about my health.
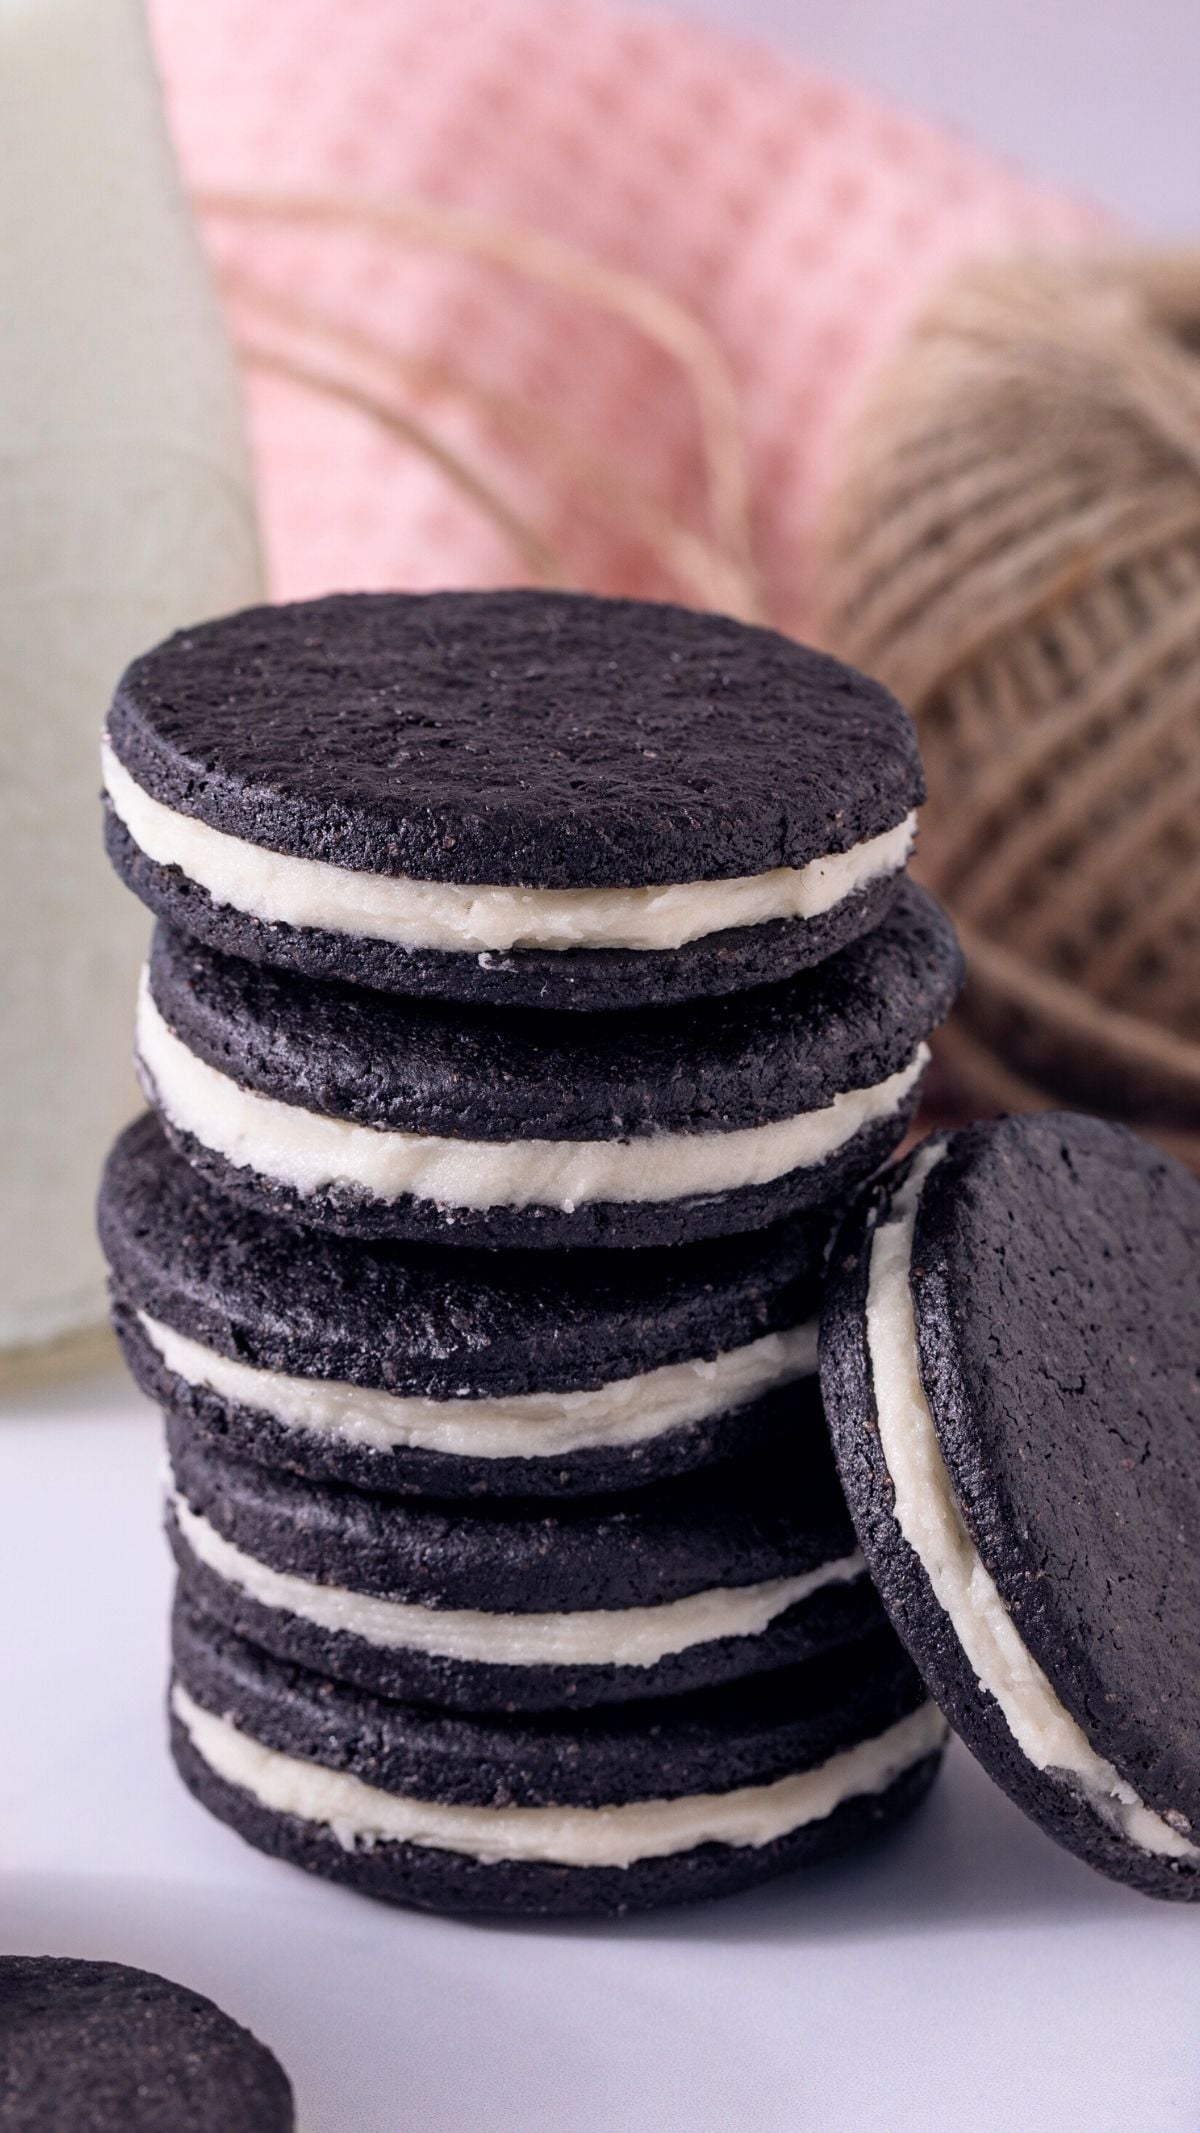
This homemade Oreo cookie recipe gives you that same iconic chocolate wafer and creamy vanilla filling without the artificial dyes, preservatives, or ingredients you can’t pronounce. And the best part? They actually taste JUST like the real thing, with that signature crispy snap everyone loves.
Jump to:
Why You’ll Love These Homemade Oreos
Let me tell you why this Oreo cookie recipe deserves a spot in your regular rotation:
No Scary Ingredients: Skip the artificial food coloring that stains your hands (and who knows what else). These cookies get their rich chocolate color from real cocoa powder.
Actually Crispy: Most homemade Oreo recipes produce soft, cake-like cookies. This one creates that authentic snap you expect from store-bought Oreos.
Food Processor Friendly: The dough comes together in a food processor or stand mixer in about 1 minute. No complicated techniques or hand-mixing required.
Ready in Under 90 Minutes: From start to finish, you’ll have 26 sandwich cookies ready in just 1 hour 25 minutes, with most of that being hands-off chilling time.
Customizable: Want double stuff? Strawberry cream? Golden Oreos? This base recipe works for ALL the variations.
Beginner-Friendly: If you’ve never made cookies from scratch before, this is your recipe. The instructions are straightforward and foolproof.
Ingredients Breakdown

Let’s talk about what makes these healthy Oreos work so well (for exact measurements, scroll to recipe card section.)
For the Cookies:
All-purpose flour: The base structure of your cookies. I recommend measuring by weight for the most consistent results.
Dutch-process cocoa powder: This is the SECRET to authentic Oreo flavor. Dutch-process cocoa has been treated to neutralize its acidity, creating that smooth, mellow chocolate taste. Don’t have Dutch-process? No worries! You can use regular cocoa powder or dark cocoa powder instead. The flavor will be slightly more intense, but still delicious.
Baking soda: Creates the perfect amount of lift and helps achieve that crispy texture.
Salt: Enhances the chocolate flavor without making the cookies taste salty.
Granulated sugar: Sweetness plus structure. This amount creates cookies that taste just right.
Unsalted butter, at cool room temperature: The fat that makes these cookies tender. Cool room temperature is key so the butter blends smoothly without making the dough greasy.
1 large egg: Binds everything together and adds richness.
Minoo’s Pro Tip: Take your butter and egg out of the fridge 30 minutes before you start. Room temperature ingredients blend together much more smoothly.
For the Filling:
Unsalted butter, at cool room temperature: Creates that classic creamy texture.
Vanilla extract: The star flavor in Oreo filling. Don’t skimp on this!
Powdered sugar, sifted: Sifting prevents lumps and creates ultra-smooth filling.
Salt: A tiny pinch that makes the sweetness sing.
If you love making homemade versions of store-bought favorites, you’ll also want to try my Homemade Goldfish Crackers and Copycat Cheez-It Crackers.
Essential Equipment
You don’t need a fancy kitchen to make homemade Oreos. Here’s what you’ll use:
Food processor or stand mixer: For mixing the cookie dough. I prefer a food processor because it’s faster and creates perfect texture.
Baking sheets: Two standard baking sheets work great.
Parchment paper: Prevents sticking and makes cleanup easy.
2-inch round cookie cutter (optional): If you’re using the roll-and-cut method. But you can also hand-shape these cookies!
Stand mixer or hand mixer: For whipping the filling. A stand mixer is easier, but a hand mixer works if you’re willing to beat for an extra minute or two.
Plastic wrap: For wrapping the dough during chilling.
Step-by-Step Instructions
Let me walk you through how to make oreos at home. Trust me, this is easier than you think!
Step 1: Make the Cookie Dough
In your food processor fitted with the S blade (or in a stand mixer with the paddle attachment), combine 1½ cups flour, ½ cup + 2 tablespoons cocoa powder, 1 teaspoon baking soda, ¼ teaspoon salt, and ½ cup sugar.
While pulsing or mixing on low speed, add ¾ cup butter a few pieces at a time. You’ll see the mixture turn crumbly, almost like wet sand.
Add 1 egg and continue processing for about 1 minute until the dough comes together in a mass. It should form a cohesive ball.
Minoo’s Pro Tip: Don’t worry if the dough looks dry at first. Keep processing and it WILL come together. Be patient!

Step 2: Chill the Dough
Turn the dough out onto your work surface and shape it into a flat disc. Wrap it tightly in plastic wrap.
Refrigerate for 30 minutes until firm enough to shape. This chilling step is non-negotiable! It makes the dough much easier to work with and helps the cookies hold their shape during baking.

Step 3: Preheat and Prep
While your dough chills, preheat your oven to 375°F.
Line two baking sheets with parchment paper. Don’t skip the parchment, it prevents sticking and ensures even browning.
Step 4: Shape Your Cookies (Two Methods)
You have two options here, and both work beautifully:
Method 1 (Roll and Cut): On a lightly floured surface, roll the chilled dough to ⅛-inch thickness. This is THIN, almost like you’re rolling out a pie crust.
Use a 2-inch round cookie cutter to cut circles. Re-roll scraps as needed to use all the dough.
Transfer cut cookies to prepared baking sheets, spacing them 1 inch apart.
Method 2 (Hand-Shaped): Pinch off tablespoon-sized pieces of dough and roll each into a smooth ball between your palms.
Place balls on prepared baking sheets, spacing them 2 inches apart (they’ll spread slightly).
Dampen your palm slightly with water and gently press each ball to flatten to ⅛-inch thickness, creating round cookies about 2 inches in diameter.
Minoo’s Pro Tip: The hand-shaped method is faster and perfect for making these with kids. The roll-and-cut method gives you more uniform cookies. Both taste identical!

Step 5: Chill Again (The Secret to Crispiness)
This is the step that makes your homemade oreo cookies actually crispy like the store-bought version.
Chill the shaped cookies in the refrigerator for 10 minutes while the oven finishes preheating. This prevents spreading and helps them hold their circular shape.
Step 6: Bake to Perfection
Bake for 9 to 10 minutes, rotating the pan halfway through for even browning.
The cookies are done when they’re fragrant, look dry on top, and feel completely set. They should feel firm to the touch.
Let them cool COMPLETELY on the baking sheets before filling. They’ll continue to crisp up as they cool, so don’t worry if they seem slightly soft when you first take them out.
Minoo’s Pro Tip: Want extra crispy cookies? Bake for the full 10 minutes or even an extra minute. They’ll be firmer and closer to store-bought texture.

Step 7: Make the Filling
While your cookies cool, make the filling.
In a stand mixer fitted with the paddle attachment, beat ½ cup butter and 2 teaspoons vanilla on medium-low speed for about 30 seconds until well combined. Scrape down the bowl.
Gradually add ½ cup powdered sugar and ⅛ salt.
Beat for 2 to 3 minutes until the filling is light, fluffy, and smooth. It should look almost white and have a whipped texture.

Step 8: Assemble Your Oreos
Using a pastry bag or small spoon, place 1 teaspoon of filling in the center of one cookie. Don’t spread it to the edges yet!
Top with a second cookie of equal size and gently press down until the filling spreads to the edges naturally.
Repeat with the remaining cookies and filling.
Minoo’s Pro Tip: Match up cookies by size before you start assembling. This makes the process faster, and your finished Oreos look more professional.

How to Know When They’re Done
This is where a lot of homemade Oreo recipes go wrong. Here’s exactly what to look for:
Visual cues: The cookies should look completely dry on top with no shiny or wet spots. They’ll be a deep, dark brown (almost black if using dark cocoa powder).
Tactile cues: When you gently touch the top of a cookie, it should feel firm and set, not soft or squishy.
Aroma cues: Your kitchen will smell AMAZING, like a chocolate bakery. That’s when you know they’re close to done.
After cooling: The cookies will firm up even more as they cool. They might feel slightly soft when first out of the oven, but give them 10 minutes and they’ll develop that crispy texture.
I’ve found that the biggest mistake people make is under-baking these cookies. They’re worried about burning them, so they pull them out too early and end up with soft, cake-like cookies instead of crispy ones.
Serving Suggestions

Now for the fun part! Here’s how to enjoy your homemade oreos:
Classic Style: Dunk them in a cold glass of milk. This is non-negotiable for the full Oreo experience.
Ice Cream Sandwiches: Place a scoop of vanilla ice cream between two cookies and press gently. Freeze for 1 hour before serving.
Crushed Topping: Crush these cookies in a food processor and sprinkle over ice cream, yogurt, or use as a pie crust base.
Oreo Truffles: Crush the cookies, mix with cream cheese, roll into balls, and dip in melted chocolate for an indulgent treat.
Lunchbox Treats: These are perfect for school lunches or snack boxes. Kids love them!
Cookie Butter Base: Blend these in a food processor with a bit of oil to make homemade Oreo butter. Spread on toast or eat with a spoon (I won’t judge).
Dessert Board: Pair these cookies with one of my best homemade marshmallow recipes to create homemade s’mores, ice cream sandwiches, or an unforgettable dessert board.
For more homemade cookie inspiration, check out my 5-Ingredient New York Style Bagels or my Easy Sourdough Recipe.
Variations to Try
Once you master the basic recipe, experiment with these fun twists:
Double Stuff Oreos: Simply double the filling recipe. Use 2 teaspoons of filling per sandwich instead of 1. Your family will thank you.
Extra Thin Oreos: Roll or flatten the cookies to about 1/16-inch thickness and reduce baking time by 1 to 2 minutes. These are super crispy and delicate.
Strawberry Oreos: Add 2 tablespoons of freeze-dried strawberry powder to the filling along with the powdered sugar. The flavor is INCREDIBLE.
Golden Oreos: Skip the cocoa powder entirely. Use 1¾ cups flour instead and add 1 teaspoon vanilla extract to the dough for vanilla-flavored cookies.
Mint Oreos: Add ½ teaspoon peppermint extract to the filling along with the vanilla. Add a few drops of green food coloring if desired.
Peanut Butter Filling: Replace half the butter in the filling with creamy peanut butter. Reduce powdered sugar to ¾ cup since peanut butter is already sweet.
Storage & Make-Ahead Tips

Here’s how to keep your homemade Oreos fresh and delicious:
Same-Day Serving: For the crispiest texture, serve these the day you make them. The cookies are at their absolute best within the first 24 hours.
Short-Term Storage: Store assembled cookies in an airtight container for up to 2 days. They’ll soften slightly but still taste amazing.
Storing Unfilled Cookies: This is my preferred method! Store unfilled cookies in an airtight container for up to 5 days. They stay much crispier when stored separately from the filling. Assemble sandwiches the day you plan to serve them.
Freezing Cookie Dough: Wrap the shaped dough disc tightly in plastic wrap, then place in a freezer bag. Freeze for up to 3 months. Thaw overnight in the refrigerator before rolling and cutting.
Freezing Baked Cookies: Store cooled, unfilled cookies in an airtight container or freezer bag for up to 2 months. Thaw at room temperature for 30 minutes before filling.
Minoo’s Pro Tip: I always make a double batch and freeze half the unfilled cookies. That way, I can whip up fresh Oreo sandwiches anytime by just making the filling!
Troubleshooting Common Issues
Let’s fix the most common problems people run into with this recipe:
Why Are My Cookies Too Soft?
This is the #1 complaint with homemade Oreo recipes. Here’s what went wrong:
Under-baking: These cookies need the full 9 to 10 minutes. Set a timer and don’t pull them early! They should feel completely firm when you touch the top.
Not cooling completely: The cookies firm up significantly as they cool. Give them at least 15 minutes on the baking sheet before testing the texture.
Skipping the pre-bake chill: That 10-minute chill before baking helps them hold their shape and develop a crisper texture.
Storage method: Assembled cookies soften faster. Store cookies and filling separately if you want maximum crispness.
Why Did My Cookies Spread Too Much?
Dough too warm: Make sure you chill the shaped cookies for the full 10 minutes before baking.
Spacing too close: These need at least 1 inch between cookies (2 inches if hand-shaping). Give them room to breathe!
Butter too soft: Your butter should be cool room temperature, not warm or melty. If your kitchen is hot, chill the dough a bit longer.
Why Is My Filling Too Thin?
Not beating long enough: The filling needs a full 2 to 3 minutes on high speed to become fluffy and thick. Don’t rush this step!
Butter too warm: Cool room temperature butter whips better than warm butter. If your filling seems runny, chill it for 10 minutes and beat again.
Measurements off: Make sure you’re using the full 1 cup of powdered sugar. Too little sugar makes thin filling.
Can I Make These Without a Food Processor?
Absolutely! Use a stand mixer with the paddle attachment or even a hand mixer. Mix the dry ingredients first, then add butter pieces and beat on medium speed until crumbly. Add the egg and continue mixing until the dough comes together. It’ll take about 2 to 3 minutes instead of 1 minute.
You can even make these by hand, though I recommend it only if you don’t have any electric mixers. Cut the cold butter into the dry ingredients using a pastry cutter or fork until crumbly, then stir in the egg until a dough forms.
More Homemade Snack Recipes You’ll Love

If you’re on a mission to recreate your favorite store-bought snacks at home, I’ve got you covered:
Copycat Cosmic Brownies– Another nostalgic childhood favorite that’s easy to make at home, with a rich fudgy texture and colorful frosting that’s even better than the store-bought version.
Homemade Goldfish Crackers - Another childhood favorite made healthier with real cheese and no artificial colors.
Copycat Cheez-It Crackers - Crispy, cheesy, and SIMPLE to make with just 4 ingredients.
Homemade 4-Ingredient Ketchup - Skip the high-fructose corn syrup and make your own in 10 minutes.
Copycat Pizza Hut Garlic Parmesan Breadsticks Recipe - Because nothing beats homemade breadsticks hot from your oven.
4-Ingredient Strawberry Chia Seed Jam in 10 Minutes - Perfect for spreading on cookies or filling variations!
Easy Same-Day Pizza Dough Recipe - Another beginner-friendly recipe that proves homemade is always better.
Final Thoughts

I BETTER NOT CATCH YOU buying those store-bought Oreos with their artificial food coloring and preservatives when you can make healthier homemade Oreos in less than 90 minutes!
These cookies prove that homemade doesn’t have to be complicated. With just a food processor, basic pantry ingredients, and a little patience while the dough chills, you can create 26 sandwich cookies that taste JUST like the real thing without the questionable ingredients.
The satisfaction of serving completely homemade Oreos to your family or friends is unmatched. Plus, once you master this basic recipe, you can experiment with all the variations to create your own signature flavors.
Give these healthy oreos a try this weekend, and I’d love to hear how they turn out for you! Rate the recipe below and leave a comment telling me which variation you’re most excited to try.
Frequently Asked Questions
Absolutely! I recommend freezing unfilled cookies for best results. Store cooled cookies in an airtight container or freezer bag for up to 2 months. You can also freeze the cookie dough wrapped tightly in plastic for up to 3 months. Thaw frozen dough in the refrigerator overnight before shaping and baking.
Assembled homemade Oreos stay fresh in an airtight container for up to 2 days. For maximum crispness, store unfilled cookies separately for up to 5 days and assemble sandwiches the day you plan to serve them. The cookies will soften over time once filled with the cream filling.
Yes! If you don’t have Dutch-process cocoa powder, you can use regular (natural) cocoa powder or dark cocoa powder. The flavor will be slightly more intense and acidic with natural cocoa, but the cookies will still taste delicious. Dark cocoa powder will give you an even darker color and richer chocolate flavor.
The most common reason is under-baking. These cookies need the full 9 to 10 minutes at 375°F to develop that signature crisp texture. They should feel completely firm when you touch the top and look dry with no shiny spots. Also make sure you’re chilling the shaped cookies for 10 minutes before baking and allowing them to cool completely on the baking sheet, they’ll continue to crisp up as they cool.
This recipe makes 26 sandwich cookies (52 individual wafers). If you want more, the recipe doubles easily! Just make sure you have enough baking sheets and oven space.
Recipe Card

Homemade Oreos
EMAIL THIS RECIPE
Enter your email and I’ll send this directly to you.
Plus you’ll get new recipes from me every week!
Ingredients
For the Cookies:
- 1½ cups all-purpose flour
- ½ cup + 2 tablespoons Dutch-process cocoa powder
- 1 teaspoon baking soda
- ¼ teaspoon salt
- ½ cup granulated sugar
- ¾ cup unsalted butter at cool room temperature, cut into chunks
- 1 large egg at room temperature
For the Filling:
- ½ cup unsalted butter at cool room temperature
- 2½ teaspoons pure vanilla extract
- ½ cup powdered sugar sifted
- ⅛ teaspoon salt
Instructions
- In a food processor fitted with the S blade or in a stand mixer with the paddle attachment, combine 1½ cups flour, ½ cup + 2 tablespoons cocoa powder, 1 teaspoon baking soda, ¼ teaspoon salt, and ½ cup sugar. While pulsing or mixing on low speed, add ¾ cup butter a few pieces at a time, then add 1 egg. Continue processing until the dough comes together in a mass, about 1 minute.
- Turn the dough out onto a work surface, shape into a flat disc, and wrap tightly in plastic wrap. Refrigerate for 30 minutes until firm enough to shape.
- Preheat oven to 375°F and line two baking sheets with parchment paper.
- Shape the cookies using one of these methods: Method 1 (Roll and Cut): On a lightly floured surface, roll the chilled dough to ⅛-inch thickness. Use a 2-inch round cookie cutter to cut circles, re-rolling scraps as needed. Transfer cut cookies to prepared baking sheets, spacing them 1 inch apart. Method 2 (Hand-Shaped): Pinch off tablespoon-sized pieces of dough and roll each into a smooth ball between your palms. Place balls on prepared baking sheets, spacing them 2 inches apart. Dampen your palm slightly and gently press each ball to flatten to ⅛-inch thickness, creating round cookies about 2 inches in diameter.
- Chill the shaped cookies in the refrigerator for 10 minutes while the oven finishes preheating. This helps them hold their shape during baking.
- Bake for 9 to 10 minutes, rotating the pan halfway through, until cookies are fragrant and completely set. They should look dry on top and feel firm to the touch. Let cool completely on the baking sheets before filling.
- In a stand mixer fitted with the paddle attachment, beat ½ cup butter and 2½ teaspoons vanilla on medium-low speed until well combined, about 30 seconds. Scrape down the bowl.
- Gradually add ½ cup powdered sugar and ⅛ teaspoon salt. Increase speed to high and beat for 2 to 3 minutes until the filling is light, fluffy, and smooth.
- Using a pastry bag or small spoon, place 1 teaspoon of filling in the center of one cookie. Top with a second cookie of equal size and gently press down until the filling spreads to the edges. Repeat with remaining cookies and filling.
- Serve the same day for the crispest texture, or store assembled cookies in an airtight container for up to 2 days.
Notes
Nutrition
Want To Save This Recipe?
Share your email & we'll send it over! PLUS, you'll get new recipes from us weekly
In the directions, you state to turn the dough out and make it a flat disc, then wrap and saran wrap. In the picture you show it as a ball?
Hi Crista! Yes I didn’t flatten mine too much but either will work. If you flatten it, it will be easier to roll out later.
So far I’ve made the dough (really easy to assemble)
They are chilling right this moment.!.
For the frosting I used salted butter.. DONT ADD THE EXTRA SALT IF YOU DO THAT.
my husband and I wanted them mint for st Pattys day! So we did that but gosh it took FOREVER to perfect so far tho I’m loving!!! ended up using like 3 cups of sugar for the filling bc I needed it thicker!
Ahh Maggie this is amazing The mint version sounds SO fun!! And you’re so right about the salted butter—thank you for sharing that tip!
Wait the ingredient list and then the instructions say different measurements… exactly how much flour? Is it an half cup, or one AND an half cup?? And how much cocoa powder?
Thank you for catching that Laura!! It should be 1 1/2 cups flour, its fixed now. And 1/2 cup + 2 tbsp cocoa powder (:
This is my first ever review of a recipe and I give it a 10 out of 10. Tastes just like an Oreo. It’s just sweet enough but feels healthier. As a mom of three little ones I really appreciate the simplicity of this recipe. Was super easy to whip up.
Thanks for sharing Minoo
Eden, this is the sweetest thing ever — your first review?! I’m so glad they tasted like the real deal for you! That balance of indulgent but a little better-for-you is exactly what I was going for. And as a busy mom of three, if you say it was simple, that means everything. Thank you for trusting the recipe!
I cant wait to try these, but you have a typo in your ingredient list. You list 1/2 c flour instead of 1.5 cups as listed in the instructions.
I just fixed it, thank you for letting me know Dawn!!