
I like to think of myself as a reasonable, responsible, law-abiding citizen–but when it comes to pickles, I plead the fifth.
I always order extra. More than once I’ve snatched an unloved pickle off an innocent friend’s plate. And I've spent hours of my life searching the supermarket for the crispiest bite, the tangiest crunch, the salty-sour symphony to make my soul sing–only to be disappointed every time.
See, I’ve never been fully satisfied with high-priced, mass-produced, lab-flavored grocery options.
But, even I was intimidated by homemade pickles.
And the thought of trying to figure out fancy fermentation or complicated canning kept me paralyzed in the pickle aisle, a Vlasic jar clutched to my chest.
Until I discovered this super-simple refrigerator method.
Jump to:
- Until I discovered this super-simple refrigerator method.
- Why Make Easy Homemade Pickles?
- What Makes These Easy Homemade Pickles Different?
- Ingredients You’ll Need for Easy Homemade Pickles
- Equipment (Spoiler: You Already Have It)
- Step-by-Step Instructions for Easy Homemade Pickles
- Flavor Variations I Love
- How to Serve Your Easy Homemade Pickles
- Troubleshooting Common Pickle Problems
- Storage and Shelf Life of Homemade Pickles
- Recipes You’ll Love With Your Homemade Pickles
- Final Thoughts
- Recipe Card
- Frequently Asked Questions
This refrigerator pickle recipe requires ZERO canning equipment or fermentation knowledge, only takes 15 minutes of active work, and is ready to eat in one week--delivering a criminal crunch of brine-soaked bliss.
So, if you’re a self-proclaimed pickle pilfer like me, read on for the flavor formula guaranteed to take your tang game to the next level.
Why Make Easy Homemade Pickles?

Growing up, my mom pickled everything. Cucumbers, peppers, radishes, carrots–you name it, she preserved it.
But I was always most obsessed with the cucumbers. Why? That PERFECT crunch.
Here’s the thing, though: stores never carried the exact flavor I craved. I’d search every aisle for that specific combination of dilly-garlicky-peppercorn perfection. After literal years on the hunt, I finally faced the facts: it just didn’t exist.
So when I learned to make my own, I never looked back.
When you make these easy homemade pickles, you control everything. You’re in charge of the salt, the spice–even the spear size.
Plus, you know EXACTLY what’s going into your jar.
No weird preservatives or artificial flavors, just real ingredients doing their thing at a much lower price point than what you’d get at the store.
What Makes These Easy Homemade Pickles Different?
Oh, let me count the ways!
- They’re user-friendly. I repeat: there’s no complicated canning. Seriously, anybody can make this simple refrigerator pickle recipe, even if you’ve never pickled anything in your life.
- No special equipment needed. No pressure cookers, no water bath canners, no fancy fermentation crocks. Just a pot, a jar, and your fridge.
- Only 15 minutes of prep time and ready in ONE WEEK. Plus, refrigerator pickles actually get BETTER as they sit. I’ve kept batches for up to two months in my fridge, and the flavor just kept intensifying.
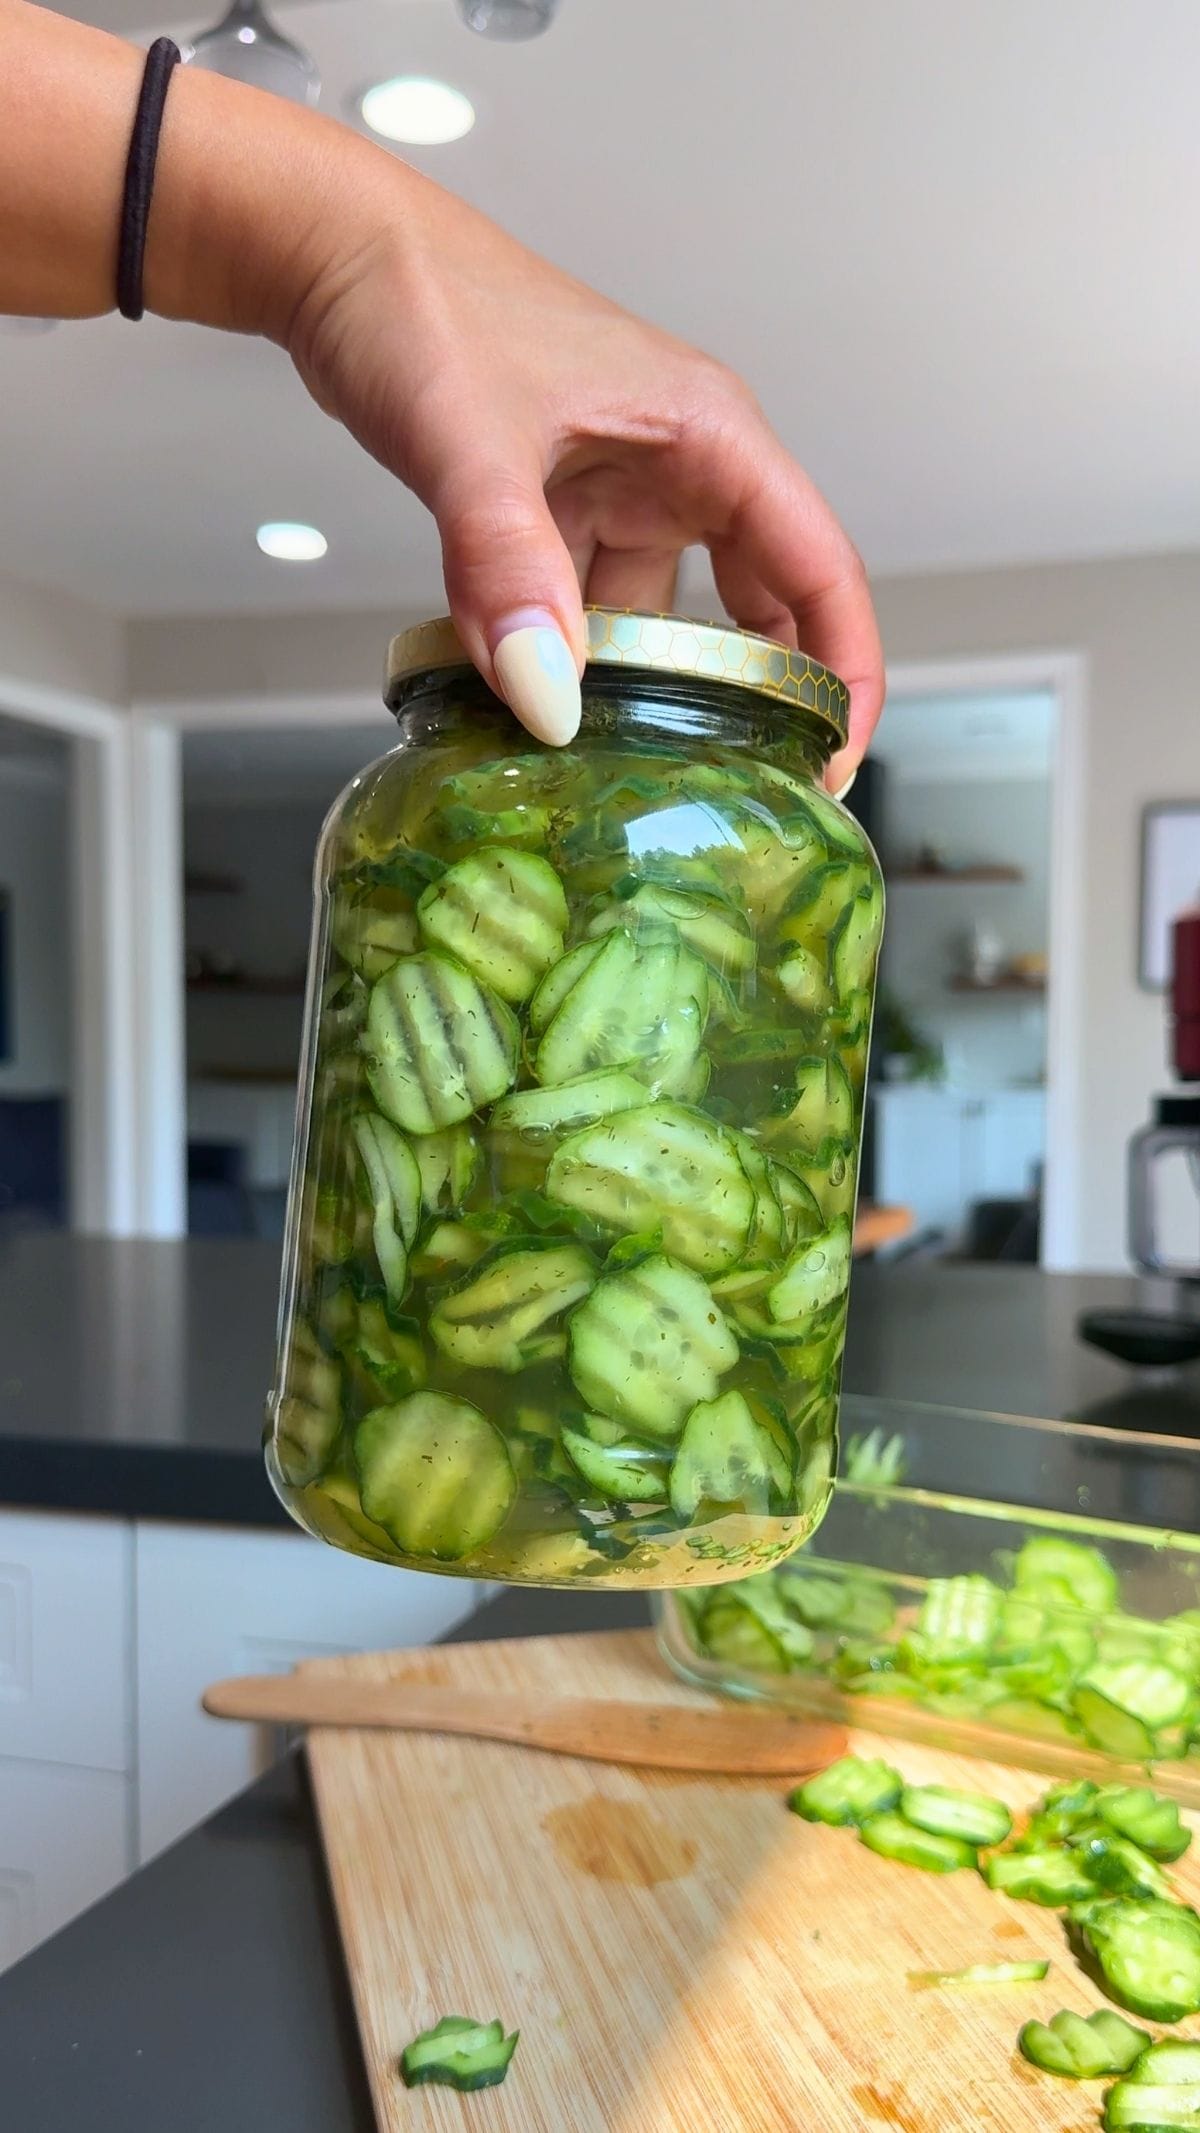
- Fabulous Results: The cucumbers transform from bright green to olive green as they soak up every drop of your flavor-packed, custom-spiced brine. The result? Crispy, crunchy, customized pickles.
Ingredients You’ll Need for Easy Homemade Pickles
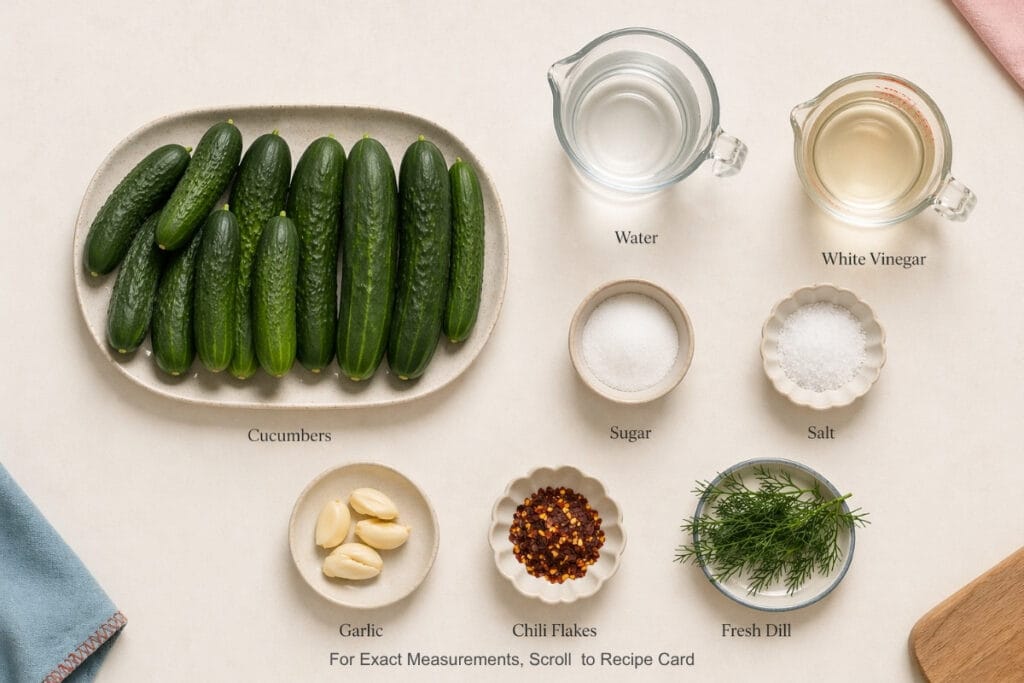
The Cucumbers
For these homemade fridge pickles, I recommend using either 10 small cucumbers or 2 large cucumbers. Cut them into ¼-inch thick coins or long spears, whatever you prefer.
My Super Secret & Helpful Tips: Kirby cucumbers or Persian cucumbers work best for their crisp texture and small seeds. English cucumbers tend to get softer and aren’t my first choice for pickling.
The Brine
Where the magic happens.
You’ll need:
- 2 cups water: The base of your pickle liquid. Use cold water for mixing.
- 1 cup white vinegar or white wine vinegar: This creates that tangy flavor pickles are known for. I prefer white wine vinegar for a slightly more complex taste, but regular white vinegar works perfectly.
- 2 tablespoons salt: I recommend kosher salt for the best flavor. Regular table salt works too, but the taste won’t be quite as good.
- 1 tablespoon sugar: It’s just enough sweetness to balance the acid without making them into sweet pickles.
Optional Flavorings

This is where you make these pickles YOURS:
- 3 to 4 garlic cloves, peeled and smashed: Essential if you’re a garlic lover like me. Smashing them releases more flavor into the brine.
- 1 to 2 teaspoons chili flakes or red pepper flakes: For heat. Start with 1 teaspoon if you’re not sure how spicy you want them.
- 3 to 4 sprigs fresh dill: The classic pickle herb. And note that fresh dill really does make a difference compared to dried.
- You can also experiment with bay leaves, mustard seeds, coriander seeds, or peppercorns. The beauty of learning how to make homemade pickles is that you get to truly make them your own.
Equipment (Spoiler: You Already Have It)
- One clean quart-sized jar (a mason jar works great)
- One small saucepan for heating the brine
- Measuring cups and tablespoons
- A knife and a cutting board
That’s it. If you’re worried about needing special pickling equipment, don’t be. This is as straightforward as it gets.
Step-by-Step Instructions for Easy Homemade Pickles
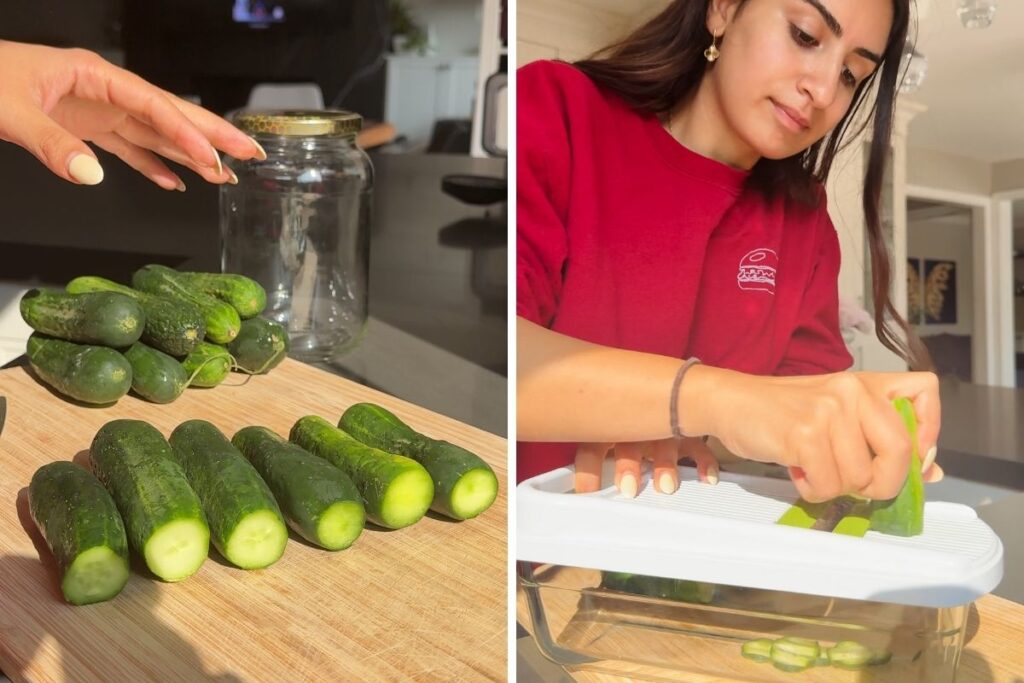
Step 1: Prep the Cucumbers
Cut 10 small cucumbers or 2 large cucumbers into ¼-inch thick coins or into long spears, depending on your preference.
I learned the hard way not to put cucumbers in whole. They don’t absorb the brine flavor nearly as well, and you end up waiting weeks instead of days for decent pickles. So, always, always slice.
Set your cucumber pieces aside while you prepare the brine.
Step 2: Make the Brine
In a small saucepan, combine 2 cups water, 1 cup vinegar, 2 tablespoons salt, and 1 tablespoon sugar.
Add any desired flavorings now. If you’re using garlic, smash 3 to 4 cloves with the side of your knife first, then toss them in. Add 1 to 2 teaspoons chili flakes if you want heat, and 3 to 4 sprigs fresh dill for that classic pickle taste.
Minoo’s Must Know: Don’t skip smashing the garlic cloves. Whole cloves won’t release nearly as much flavor into your brine.

Step 3: Heat the Brine
Place the pot over medium heat and stir occasionally until the mixture comes to a simmer and the sugar and salt dissolve completely, about 3 to 5 minutes.
You’ll know it’s ready when the liquid is clear with no visible granules of salt or sugar. Stir a few times to help everything dissolve faster.
Remove from heat and let cool for 5 to 10 minutes. You want it warm, not boiling hot, when you pour it over the cucumbers.
Minoo’s Must Know: If your brine is too hot when you pour it over the cucumbers, they can turn mushy. Always let it cool slightly first.

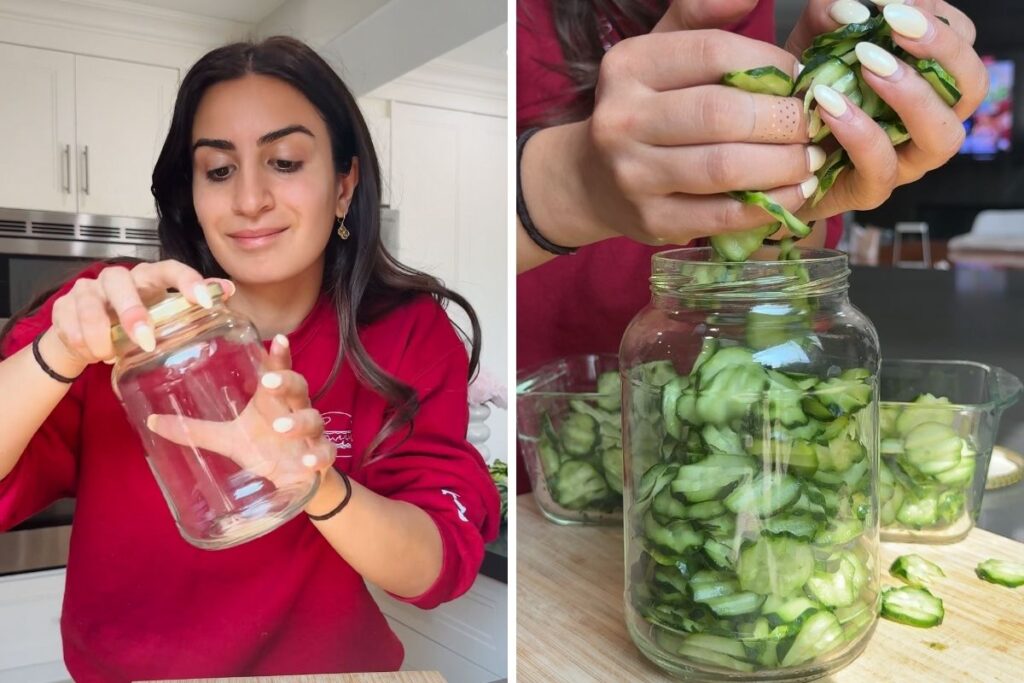
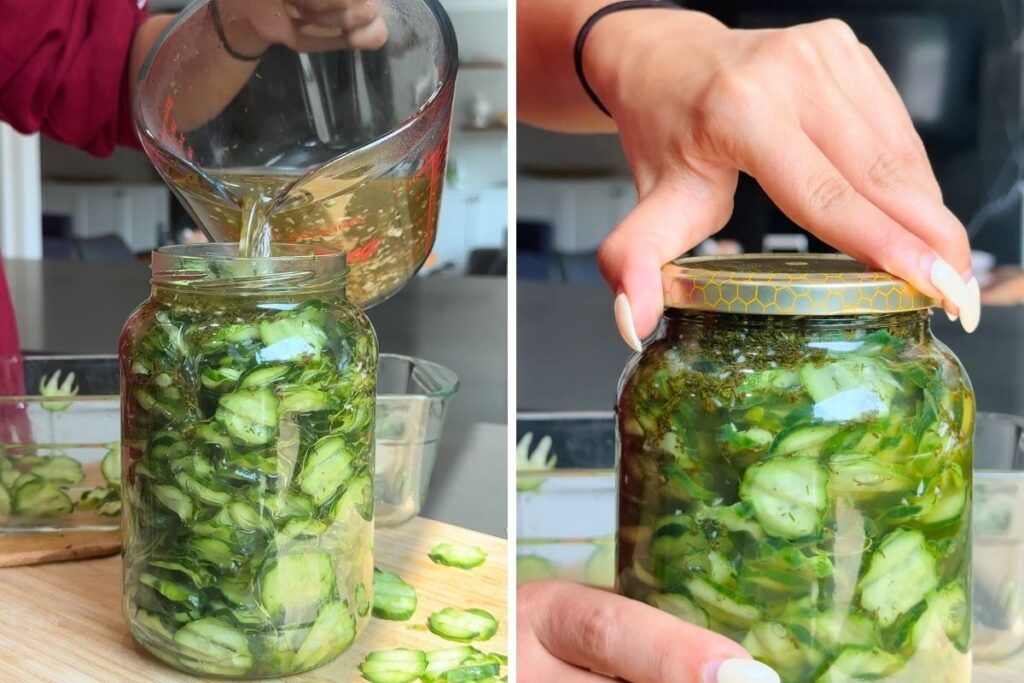
Step 4: Pack the Jar
Place your cucumber pieces into a clean quart-sized jar, packing them tightly but without crushing them.
Leave about ½ inch of headspace at the top of the jar. This gives you room for the brine without overflowing when you seal it.
Step 5: Add the Brine
Pour the warm brine over the cucumbers, making sure they’re completely submerged under the liquid.
Tap the jar gently on the counter a few times to release any air bubbles trapped between the cucumber pieces.
If any cucumbers are floating above the brine line, push them down or add a bit more liquid. Everything needs to stay under the pickle brine to pickle properly and stay safe.
Seal the jar tightly with the lid.
Step 6: Refrigerate and Wait
Place your jar in the refrigerator and let the pickles cure for 1 week.
I know it’s tempting to taste them earlier, but trust me on this. That first week is when the cucumbers transform from regular vegetables into PICKLES, changing from bright green to olive as they soak up all that brine.
After one week, they’re ready to eat. And, they’ll actually taste even better after two weeks when the flavors have had even more time to develop.
Flavor Variations I Love
Once you master the basic recipe for how to make pickles at home, you can experiment with different flavor combinations. Here are my top four faves:
Sweet Chili Pickles
Add 2 tablespoons of extra sugar to the brine along with 2 teaspoons chili flakes. The sweetness balances the heat perfectly.
Spicy Jalapeño Pickles
Toss in 1 sliced jalapeño pepper along with the garlic and extra red pepper flakes. These are AMAZING on burgers and sandwiches.
Classic Garlic Dill Pickles
Use 5 to 6 smashed garlic cloves and a full ¼ cup of fresh dill. This is the flavor profile most people think of when they imagine pickles.
Herb Garden Pickles
Skip the dill and instead use a combination of fresh herbs like rosemary, thyme, and oregano. Add 2 to 3 teaspoons of mustard seeds for extra flavor complexity.
Minoo’s Must Know: Write the flavor combination and date on a piece of tape stuck to your jar. When you find a version you love, you’ll remember exactly what you put in it.
How to Serve Your Easy Homemade Pickles

These homemade refrigerator pickles are incredibly versatile. Here’s how I use them:
- On quick and easy hamburger buns and hot dogs for that classic crunch. Nothing beats homemade buns with homemade pickles, and a side of quick homemade ketchup
- Straight out of the jar for snacking. I eat these constantly when I have a batch in the fridge.
- Chopped up in salads for extra tang and crunch. They add so much more flavor than raw cucumbers.
- On sandwiches of any kind. From turkey to grilled cheese, these pickles elevate everything.
- With homemade Doritos and other snacks to add some salty zang.
- Alongside homemade ketchup to upgrade your condiments corner.
- However, your kids want to eat them! Kids LOVE these pickles, especially when they get to help make them. It’s a fun way to get them interested in cooking their meals and eating vegetables.
Troubleshooting Common Pickle Problems
After making countless batches of these pickles and reading comments from others who’ve tried them, here are solutions to the most common issues I found:
Mushy pickles: Your brine was too hot when you poured it over the cucumbers, or your cucumbers were overripe. Always use firm, fresh cucumbers and let the brine cool to warm (not hot) before pouring.
Not crunchy enough: You might have used English cucumbers instead of Kirby or Persian varieties. Some cucumber types just don’t pickle as crisply. Also make sure you’re giving them the full week to cure.
Too salty: Next batch, reduce the salt to 1½ tablespoons instead of 2. You can also rinse the pickles briefly under cold water before eating if the current batch is too salty for your taste.
Not enough flavor: The pickles might need more time. Give them another week in the fridge. Or next time, add more garlic and herbs to the brine.
Pickles are floating: This is normal and won’t hurt anything, but you can weigh them down with a small zip-top bag filled with brine placed on top of the pickles before sealing the jar.
Storage and Shelf Life of Homemade Pickles

These best homemade pickles will keep in the refrigerator for up to 2 months. The flavor continues to develop over time, growing in complexity and deliciousness.
Always use a clean fork or spoon when removing pickles from the jar. Introducing bacteria from your fingers or a used utensil can reduce shelf life.
If you notice any off smells, mold, or the liquid becomes cloudy and slimy, discard the batch. But honestly, these pickles are usually eaten long before they have a chance to go bad.
Minoo’s Must Know: Make multiple jars at once with different flavor combinations. That way you always have your favorite pickles ready to go, and you can compare which flavors you prefer.
Recipes You’ll Love With Your Homemade Pickles
If you enjoyed learning how to make your own pickles, you’ll love these other homemade staples:
- Homemade Butter Recipe: Another simple and decadent recipe that puts store-bought to shame. Once you try homemade butter, you won’t want to go back.
- How to Make Mozzarella Cheese: Fresh mozzarella at home is easier (and tastier) than you think.
- Homemade Ketchup: Made with real, whole ingredients, this is the perfect burger pairing with your pickles.
- Quick Hamburger Buns: Might as well make your buns from scratch, too! And this recipe only takes 30 minutes.
Final Thoughts

Listen, don’t waste your time or money on mediocre store-bought pickles when you can make a better, healthier, tastier version at home in just 15 minutes of work!
These easy homemade pickles prove that you don’t need special equipment, fermentation knowledge, or hours of time to create something incredible. Just a pot, a jar, one week of patience, and you’ll have the crunchiest, tangiest, flavor-packed personalized pickles you’ve ever tasted.
Make a batch this weekend and let me know how they turn out! Drop a comment below with your favorite flavor combination, and don’t forget to rate this recipe–that helps others find it too. Pickle Lovers Unite!
Now go get brining. You got this!
Recipe Card

Easy Homemade Pickles (15 Minutes)
EMAIL THIS RECIPE
Enter your email and I’ll send this directly to you.
Plus you’ll get new recipes from me every week!
Ingredients
For the Pickles:
- 10 small cucumbers or 2 large cucumbers
For the Brine:
- 2 cups water
- 1 cup white vinegar or white wine vinegar
- 1 tablespoon sugar
- 2 tablespoons salt
Optional Flavorings:
- 3-4 garlic cloves peeled and smashed
- 1-2 teaspoons chili flakes
- 3-4 sprigs fresh dill
Instructions
- Prep the cucumbers: Cut 10 small or 2 large cucumbers into ¼-inch coins or into long spears, depending on your preference.
- Make the brine: In a small pot, combine 2 cups water, 1 cup vinegar, 1 tablespoon sugar, and 2 tablespoons salt. Add any flavorings you like, such as garlic cloves, chili flakes, or fresh dill.
- Heat the brine: Place the pot over medium heat and stir occasionally until the mixture comes to a simmer and the sugar and salt have completely dissolved, about 3 to 5 minutes. Remove from heat and allow to cool for 5 to 10 minutes.
- Pack the jar: Place the cucumber pieces into a clean quart-sized jar, packing them as tightly as possible without crushing them.
- Add the brine: Pour the warm brine over the cucumbers, making sure they are completely submerged. Seal the jar tightly with the lid.
- Refrigerate: Place the jar in the refrigerator and let the pickles rest for 1 week before enjoying.
Nutrition
Want To Save This Recipe?
Share your email & we'll send it over! PLUS, you'll get new recipes from us weekly
Frequently Asked Questions
These refrigerator pickles need 1 week in the fridge before they’re ready to eat. However, they taste even better after 2 weeks when the flavors have fully developed. You can eat them sooner, but they won’t have that full pickle flavor yet.
No, you don’t need to sterilize jars for refrigerator pickles since they’re stored cold, not shelf-stable. Just use a clean jar washed with hot soapy water. The vinegar and salt in the brine help preserve the pickles in the fridge.
Yes, apple cider vinegar works fine and gives a slightly milder, sweeter flavor. The pickles will also have a light brown tint instead of staying bright green. Any vinegar with at least 5% acidity will work for this recipe.
The most common reason is using the wrong cucumber variety. English cucumbers get soft, while Kirby or Persian cucumbers stay crisp. Another reason is adding brine that’s too hot, which cooks the cucumbers and makes them mushy. Always cool the brine to warm before pouring.
These pickles last up to 2 months in the refrigerator when stored properly. and, they’ll continue developing flavor the entire time. Just make sure the cucumbers stay submerged under the brine and always use a clean utensil when removing them from the jar. .
I don’t recommend reusing pickle brine for safety reasons. The vinegar concentration decreases each time, and bacteria from the previous batch could be present. It’s better to make fresh brine for each new batch of pickles.
For same-day quick pickles, use HOT brine (not just warm) and slice your cucumbers very thinly. They’ll be lightly pickled within 2 to 3 hours. However, they won’t have the full flavor or crunch of pickles that have cured for a week.
Kirby cucumbers and Persian cucumbers are the best choices because they stay crispy and have small seeds. Avoid English cucumbers, which tend to get soft and watery when pickled. Always choose firm, fresh cucumbers without soft spots.
Any recipe suggestions for people on low sodium diets?
Hi Paul! Most of my breads have just a pinch of salt which is really just to enhance the flavour of the bread. Nothing more than a pinch. You can omit it but you would get as much of a rise & a slightly bland flavour.
So easy & so good!
So happy to hear that May!
How long do the pickles last in the refrigerator?
Up to 2 weeks!!
So you let them rest for 1 week. So they’re good for another 2 weeks in the refrigerator?
Yes that’s correct!