
Your kids are going to lose their minds when they taste these homemade goldfish crackers, and you’re going to lose your mind when you realize how SIMPLE they actually are to make.

I’m talking about four ingredients, thirty minutes, and crackers so good that one of my readers literally said “I made these, and now I CAN’T STOP!” Trust me, once you see how ridiculously easy this is, you’ll understand why parents everywhere are ditching those orange boxes forever.
Watch Me Make These Homemade Goldfish Crackers
Jump to:
- Watch Me Make These Homemade Goldfish Crackers
- Why These Homemade Goldfish Crackers Beat the Store Version Every Time
- The 4 Simple Ingredients That Make Magic Happen
- Step-by-Step Instructions: From Dough to Delicious
- Creative Variations to Keep Things Interesting
- How to Serve These Irresistible Crackers
- Troubleshooting Common Issues
- More Healthy Snack Recipes You’ll Love
- Why I’ll Never Go Back to Store-Bought
- Recipe Card
- Frequently Asked Questions
If you’re a visual learner like me, you’ll want to see exactly how this comes together.
I filmed the entire process so you can follow along step-by-step and see just how SIMPLE this really is.
Trust me, watching the dough transform into perfect little crackers in real-time will convince you that you can absolutely nail this recipe on your first try.

Why These Homemade Goldfish Crackers Beat the Store Version Every Time
Let’s be real for a hot second. You flip over that familiar orange box and what do you see? A novel-length ingredient list with words you need a chemistry degree to pronounce. Meanwhile, these homemade healthy goldfish crackers need exactly FOUR ingredients that you probably already have in your kitchen right now.
Here’s what makes these BETTER than anything you can buy:
Clean ingredients you can pronounce. No mysterious preservatives, no artificial colors that turn your kid’s tongue orange, no ingredients that sound like they belong in a lab experiment.
Better taste and texture. I’ve had readers tell me their friends who “normally don’t like goldfish crackers at all” couldn’t stop eating these homemade ones. That’s the power of real cheese and homemade butter from scratch, people!
Cost-effective. Four simple ingredients versus paying premium prices for processed snacks? Your wallet will thank you.
Ready in 30 minutes. From start to finish, you can have fresh, warm, cheesy crackers cooling on your counter faster than you can drive to the store and back.
Minoo’s Pro Tip: Make a double batch. Seriously. These disappear faster than you think, and you’ll thank me later when you’re not making emergency trips to the kitchen at 9 PM because everyone ate them already.
The 4 Simple Ingredients That Make Magic Happen
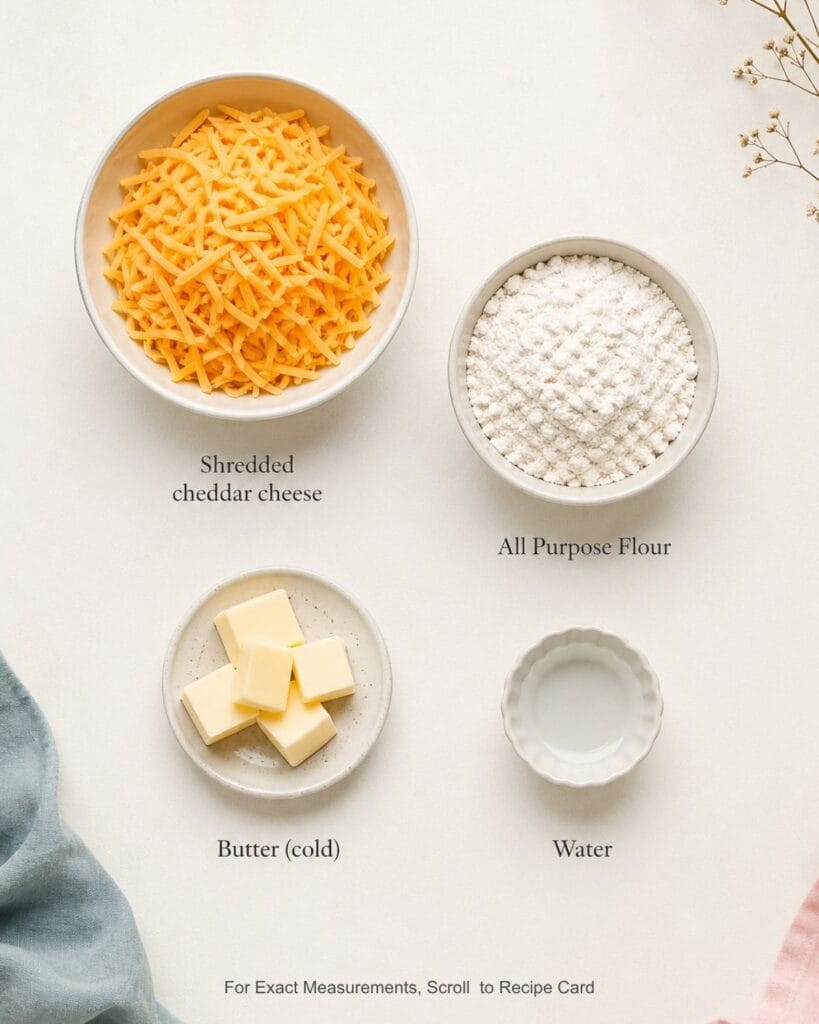
This is where it gets EXCITING, because you’re about to realize how unnecessary all that processed stuff really is.
Shredded Cheddar Cheese (1 cup): This is your flavor powerhouse. I recommend using sharp cheddar because it gives you that bold, cheesy taste that makes these crackers irresistible. Sharp cheddar also has less moisture than mild varieties, which means crispier crackers. You can use pre-shredded if that’s what you have, but freshly grated from a block will give you the best texture.
All-Purpose Flour (½ cup): The foundation of your crackers. This creates the structure that holds everything together while keeping the texture light and crispy. Don’t overthink this one - regular all-purpose flour is perfect.
Cold Butter (2 tablespoons): Here’s the secret to that flaky, melt-in-your-mouth texture. The cold butter creates little pockets as it bakes, giving you crackers that are crispy but not tough. Make sure it’s COLD - straight from the fridge cold.
Cold Water (2-3 tablespoons): Just enough to bring everything together into a workable dough. Start with 2 tablespoons and add more only if needed. The exact amount can vary depending on humidity and how much moisture your cheese has.
That’s it. Four ingredients. No preservatives, no artificial anything, no ingredients you can’t pronounce to your kids.
Step-by-Step Instructions: From Dough to Delicious
I promise you, this is so much easier than you think. One reader told me
"I just made this for the kids and they turned out AMAZING. It's a hit and seriously so easy and quick to make"
So let me walk you through it:
Step 1: Preheat and Prep (2 minutes) Preheat your oven to 350°F and line a baking sheet with parchment paper. Get everything ready because once you start mixing, this moves FAST.
Step 2: Pulse the Dry Ingredients (30 seconds) In a food processor, combine 1 cup shredded cheddar cheese, ½ cup all-purpose flour, and 2 tablespoons cold butter. Pulse 8-10 times until the mixture looks like coarse crumbs with the butter evenly distributed. Don’t have a food processor? No problem - you can do this by hand with a pastry cutter or two knives.

Step 3: Add Water Gradually (15 seconds) With the processor running, slowly drizzle in 2 tablespoons cold water through the feed tube. Stop as soon as the dough comes together in a ball, about 10-15 seconds. Add the remaining tablespoon of water only if the dough seems too dry to hold together.

Step 4: Roll and Shape (5 minutes) Turn the dough onto a lightly floured surface and gently knead 2-3 times until smooth. Roll out to ¼-inch thickness, turning the dough 90 degrees occasionally to maintain even thickness. The thinner you roll it, the crispier your crackers will be.

Step 5: Cut and Arrange (8 minutes) Here’s where the fun begins! Use a small goldfish cookie cutter to cut out shapes and transfer them to your prepared baking sheet, spacing them ½ inch apart. Don’t have a goldfish cutter? One creative grandma used a star cutter and called them “starfish” with her grandson - GENIUS! You can also just cut them into squares.

Step 6: Bake to Perfection (10-15 minutes) Bake for 10-15 minutes until the edges are lightly golden and the crackers feel crisp when gently tapped. Keep a close eye on them during the last few minutes - they can go from perfect to overdone quickly.

Step 7: Cool and Store Cool on the baking sheet for 5 minutes before transferring to a wire rack. This step is CRUCIAL for getting that perfect crispy texture.
Minoo’s Pro Tip: Don’t skip the cooling time! I know they smell incredible and you want to eat them immediately, but letting them cool completely ensures maximum crispiness.

Creative Variations to Keep Things Interesting
Once you master the basic recipe (and trust me, you will after one batch), here are some fun ways to switch things up:
Different Cheese Options: Try Gruyère for a nutty flavor, aged white cheddar for extra sharpness, or even a Mexican cheese blend for a southwestern twist.
Seasoning Adventures: Add ¼ teaspoon garlic powder, onion powder, or paprika to the flour mixture. Everything bagel seasoning sprinkled on top before baking is also incredible.
Shape Variations: One reader ordered “a bunch of mini cutters for the kids to help make next time and have fun!” Get your kids involved with different shapes - stars, hearts, animals, whatever makes them excited to cook with you.
How to Serve These Irresistible Crackers

These homemade goldfish recipe crackers are perfect for:
Back to school snacks that parents can feel good about packing in lunch boxes. No more worrying about artificial ingredients or preservatives.
Party appetizers that both kids and adults will devour. For a nostalgic party or movie-night spread, serve them with homemade Cheez-Its and my diy cosmic brownies so you have something salty, cheesy, and chocolatey on the same platter.
Movie night munchies that won’t leave you feeling guilty about what your family is eating.
After-school treats that give kids energy instead of crashing them with processed sugar.
Pair them with soup, serve them as a side with sandwiches, or just eat them by the handful (which is what’s going to happen, let’s be honest).
Troubleshooting Common Issues
Don’t worry, I’ve got your back if things don’t go perfectly the first time:
Dough too sticky? Add a little more flour, one tablespoon at a time, until it’s manageable.
Dough too dry and crumbly? Add water one teaspoon at a time until it comes together.
Crackers not crispy enough? Roll them thinner next time, or bake for an extra 2-3 minutes. Every oven is different!
Shapes losing definition? Make sure your dough is cold and don’t overwork it when cutting shapes.
Minoo’s Pro Tip: If your crackers seem to lose their crispness after storing, just pop them in a 300°F oven for 3-4 minutes to bring back that perfect crunch.

More Healthy Snack Recipes You’ll Love
If you’re on a mission to replace processed snacks with homemade goodness (and you SHOULD be!), you need to try these:
- 3-Ingredient Homemade Cheez its
- 3-Ingredient High Protein Bagel Bites for a protein-packed snack
- 30-Minute 6-Ingredient Hamburger Buns when you want to go completely homemade
- Tortillas for wraps and quesadillas
- 3-Ingredient Healthified High-Protein Chicken Nuggets for a complete meal
- 4-Ingredient Strawberry Chia Seed Jam in 10 Minutes to pair with crackers
- Homemade 4-Ingredient Ketchup because why stop at crackers?
Why I’ll Never Go Back to Store-Bought

Here’s the thing, once you see how SIMPLE it is to make better-tasting, healthier snacks at home, those orange boxes start looking pretty ridiculous. I BETTER NOT CATCH YOU buying processed goldfish crackers when you can whip these up in less time than it takes to get everyone in the car!
One reader summed it up perfectly: these are “so adorable and delicious” and kids absolutely LOVE them. Another told me her grandson will “love them” and when grandparents approve, you KNOW you’ve got a winner.
Your family deserves snacks made with real ingredients they can pronounce. You deserve to feel good about what you’re feeding them. And honestly? You deserve to experience that proud moment when your kids choose your homemade crackers over anything from a box.
So what are you waiting for? Get in that kitchen and show those processed snacks who’s boss! I can’t wait to hear how your first batch turns out… Come back and let me know in the comments!
Recipe Card

30-Minute Homemade Goldfish Crackers Recipe for Guilt-Free Snacking
EMAIL THIS RECIPE
Enter your email and I’ll send this directly to you.
Plus you’ll get new recipes from me every week!
Equipment
Ingredients
- 1 Cup Shredded cheddar cheese (or cheese of choice)
- ½ Cup All Purpose Flour
- 2 tablespoon Butter (cold)
- 2-3 tablespoon Water
Instructions
- Preheat oven to 350°F and line a baking sheet with parchment paper.
- In a food processor, combine 1 cup shredded cheese, ½ cup flour, and 2 tablespoons cold butter. Pulse 8-10 times until the mixture looks like coarse crumbs with the butter evenly distributed.
- With the processor running, slowly drizzle in 2 tablespoons water through the feed tube. Stop as soon as the dough comes together in a ball, about 10-15 seconds. Add the remaining 1 tablespoon water only if needed.
- Turn dough onto a lightly floured surface and gently knead 2-3 times until smooth. Roll out to ¼-inch thickness, turning the dough 90 degrees occasionally to maintain an even thickness.
- Using a small cookie cutter or knife, cut into desired shapes and transfer to the prepared baking sheet, spacing them ½ inch apart.
- Bake for 10-15 minutes until the edges are lightly golden and the crackers feel crisp when gently tapped. Cool on the baking sheet for 5 minutes before transferring to a wire rack.
Video
Notes
Nutrition
Want To Save This Recipe?
Share your email & we'll send it over! PLUS, you'll get new recipes from us weekly
Frequently Asked Questions
Absolutely! Use a pastry cutter or two knives to cut the cold butter into the flour and cheese mixture until it resembles coarse crumbs, then add water gradually until the dough comes together.
Store them in an airtight container at room temperature for up to one week. If they lose their crispness, pop them in a 300°F oven for 3-4 minutes to refresh them.
Yes! Sharp cheddar works best, but you can use Gruyère, aged white cheddar, or any semi-hard cheese. Avoid very soft or high-moisture cheeses as they won’t crisp up as well.
Get creative! Use any small cookie cutter you have - stars, hearts, squares, or even cut them into rectangles with a knife. The shape doesn’t affect the taste.
Yes, you can wrap the dough in plastic wrap and refrigerate it for up to 24 hours. Let it come to room temperature for a few minutes before rolling if it’s too hard to work with.
Yes, these make excellent toddler snacks since you control all the ingredients. Just make sure the crackers are an appropriate size to prevent choking hazards.
So, I have to have the goldfish shape! Where did you purchase yours? TIA.
Trish, I totally get it — the goldfish shape makes it so much more fun! I found my cutter online (Amazon has a bunch of small goldfish-style cutters). Just search for mini fish cookie cutter and you should see a few options pop up.
I rolled out my dough and scored to make crackers. Delicious and very easy.
Love that!! And I’m glad you liked it (:
Hi, when you say ‘butter,’ do you refer to margarine or real butter (unsalted or salted)?
Hi Susan!! Unsalted butter is what I use. If you want to use salted butter you can just omit the salt in the recipe.
Please let us know HOW to store (fridge, pantry) this wonderful recipe for Goldfish you’ve developed. Thanks so much
Hi Queene!! Absolutely (: So glad you liked the goldfish. You can store them in an air tight container on the counter or in the fridge for 3-5 days!