
Whether you’re making meatball subs, Italian hoagies, or simple turkey sandwiches, this easy 5-ingredient Italian sub rolls recipe will make you wonder why you ever settled for store-bought bread.

Why These Italian Sub Rolls Are a Game-Changer
Jump to:
- Why These Italian Sub Rolls Are a Game-Changer
- Perfect for Any Sandwich
- Ingredients for Italian Sub Rolls
- Step-by-Step Instructions
- Tips for Perfect Italian Sub Rolls
- Storage and Make-Ahead Options
- Variations on the Basic Italian Rolls Recipe
- Why Make Your Own Italian Sub Rolls?
- Ready to Create the Perfect Sandwich?
- Recipe Card
- Frequently Asked Questions
The beauty of this Italian rolls recipe lies in its simplicity. With just five basic ingredients, flour, water, yeast, salt, and a touch of oil, you can create bakery-quality rolls. No special equipment or techniques required!
These Italian sub rolls come together quickly. The initial rise takes just 15 minutes, meaning you can have fresh-baked rolls on your table in about 75 minutes total. Perfect for those last-minute dinner plans or when you’re craving something special for lunch.
Phyl W., shared:
“Made these tonight for meatball sandwiches. Excellent recipe and so pleased with how light the bread was. Will definitely make them again and again.”
Perfect for Any Sandwich
These Italian sub rolls are perfect for practically any sandwich filling you can imagine:

- Classic Italian cold cuts with provolone cheese and vinaigrette
- Hearty meatball subs swimming in marinara sauce and melted cheese
- Philly cheesesteaks loaded with thinly sliced beef and caramelized onions
- Traditional Italian beef sandwiches with au jus for dipping
- Simple turkey and cheese with fresh veggies for school or work lunches
The slightly chewy texture means these rolls can stand up to hot, saucy fillings without getting soggy.
Ingredients for Italian Sub Rolls
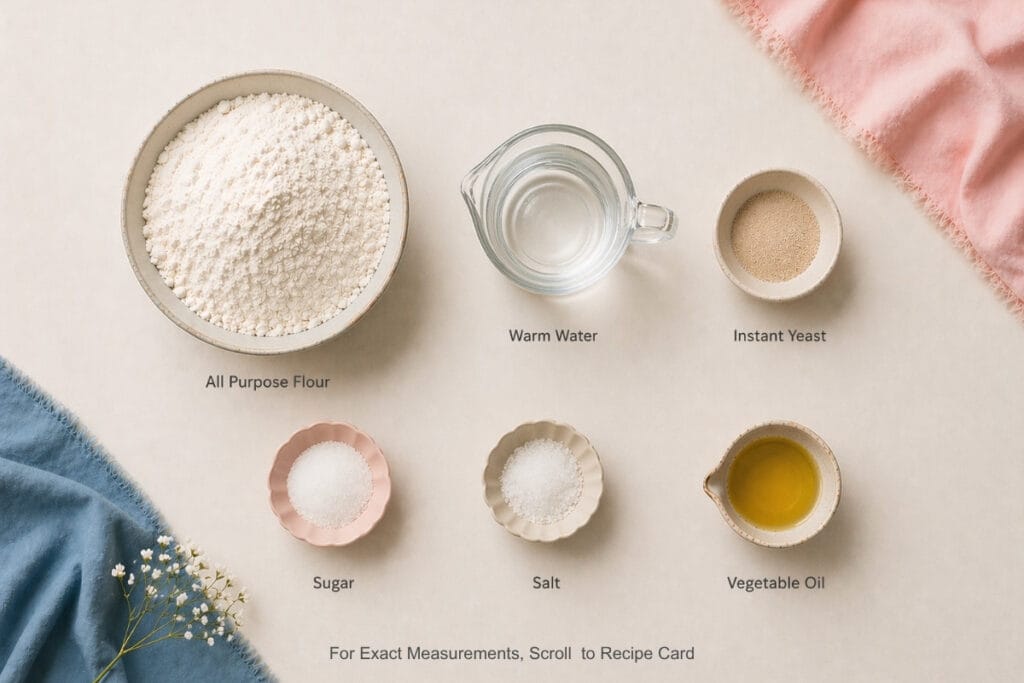
This recipe makes four sub rolls, perfect for sandwiches. Here’s what you’ll need:
- 1½ cups warm water (105-110°F) – The perfect temperature activates the yeast without killing it
- 2 tablespoons instant yeast – Provides a quick rise, perfect for when you’re short on time
- 3½ teaspoons sugar – Feeds the yeast and adds a subtle sweetness to balance the savory flavor
- 1½ teaspoons salt – Enhances flavor and controls yeast activity
- 3½ teaspoons vegetable oil – Creates a softer texture in the finished rolls
- 4 cups all-purpose flour – The foundation of our Italian rolls recipe
Optional Toppings:
- Sesame seeds
- Poppy seeds
- Everything bagel seasoning
- Coarse sea salt
- Italian seasoning
- Cheese
Step-by-Step Instructions
1. Prepare the Dough

In a large bowl, combine the warm water, instant yeast, sugar, salt, and vegetable oil. Give it a good stir to dissolve the yeast and sugar.
Add the flour gradually, mixing as you go, until a rough, shaggy dough forms. The dough will look a bit uneven at this stage, but don’t worry - that’s perfectly normal for this Italian sub rolls recipe.
Cover the bowl with a clean kitchen towel or plastic wrap and let it rest for 15 minutes. This short rest period allows the flour to fully hydrate and the yeast to begin working its magic.
2. Knead and Shape

After resting, you’ll notice the dough has already grown about 50% larger, that’s the power of instant yeast! Transfer the dough to a lightly floured work surface.
Knead the dough for 2-3 minutes until it becomes smooth and elastic. You’ll know it’s ready when it forms a nice, cohesive ball that springs back slightly when poked.
Divide the dough into four equal pieces (about 8 ounces each). Shape each piece into a ball, then roll each ball into an 8×8 inch square. Don’t worry about making perfect squares, approximate dimensions work just fine for this Italian rolls recipe.
3. Form the Rolls

Starting from one edge, roll each square very tightly into a cylinder, similar to making a jelly roll. This tight rolling creates the classic Italian sub roll structure.
Pinch the seams and sides closed firmly, then gently roll each cylinder on your work surface to elongate it to your desired length, typically 8-9 inches for a standard sub sandwich.
4. Rise and Bake

Transfer your shaped Italian sub rolls to a parchment-lined baking sheet, leaving enough space between them for expansion. Lightly brush the tops with water, which helps create a nice crust.
Cover the rolls with a clean kitchen towel and let them rise in a warm spot for 30 minutes. During this time, preheat your oven to 375°F.
Once risen, brush the rolls with water once more and sprinkle with any desired toppings. Traditional Italian rolls often feature sesame seeds, but you can customize them to your preference.
Bake for 20-25 minutes until the rolls are golden brown. A properly baked Italian sub roll should sound hollow when tapped on the bottom.
Tips for Perfect Italian Sub Rolls
For the best results with this Italian sub rolls recipe, keep these tips in mind:

- Water temperature matters: Too hot, and you’ll kill the yeast; too cool, and it won’t activate properly. Aim for water that feels warm to the touch but not hot (105-110°F).
- Don’t rush the shaping: Taking time to roll the dough tightly results in a better texture and structure in your finished Italian rolls.
- Check for doneness: Properly baked Italian sub rolls should be golden brown and sound hollow when tapped on the bottom.
- Let them cool completely: For the best texture, allow your rolls to cool fully before slicing and filling them. This helps set the crumb structure of the bread.
Storage and Make-Ahead Options
These Italian sub rolls stay fresh for 2-3 days when stored in an airtight container or bag at room temperature. For longer storage, you can freeze them for up to 3 months.
To freeze, allow the rolls to cool completely, then wrap each one individually in plastic wrap, followed by aluminum foil, or place in a freezer bag.
To refresh rolls before serving, either:
- Thaw at room temperature, then warm in a 350°F oven for 5-7 minutes
- Or toast lightly just before assembling your sandwiches
Variations on the Basic Italian Rolls Recipe
While this 5-ingredient version is fantastic, here are some easy variations to try:

- Garlic Herb Italian Rolls: Add 1 teaspoon garlic powder and 1 tablespoon Italian seasoning to the dough
- Whole Wheat Blend: Replace 1 cup of all-purpose flour with whole wheat flour for a nuttier flavor
- Olive Oil Upgrade: Substitute the vegetable oil with olive oil for more authentic Italian flavor
- Crusty Version: Place a shallow pan of water on the bottom rack of your oven while baking to create steam, which helps develop a crispier crust
Why Make Your Own Italian Sub Rolls?
- Freshness: Nothing beats the taste of bread fresh from your oven
- Control: You know exactly what ingredients are in your bread - no preservatives or additives
- Customization: Adjust the size, shape, and toppings to suit your preferences
- Cost-effective: Homemade rolls cost a fraction of what you’d pay at specialty bakeries
- Satisfaction: There’s something deeply rewarding about creating your own bread from scratch
Once you master this simple Italian rolls recipe, you might find yourself making fresh bread regularly, it’s that easy and delicious!
Ready to Create the Perfect Sandwich?

Now that you’ve mastered homemade Italian sub rolls, it’s time to fill them with your favorite ingredients. Whether you prefer a classic Italian sandwich filled with cold cuts or a warm meatball sub covered in melted cheese, these rolls provide the perfect foundation.
The next time you’re planning sandwiches for lunch or dinner, skip the bakery and try this easy 5-ingredient Italian sub rolls recipe instead. Your taste buds and your wallet will thank you!
Remember to share your creations with me in the comments below. I'd love to hear how this Italian rolls recipe turned out for you and what delicious fillings you chose for your homemade sub sandwiches!
Recipe Card

How to Make 5-Ingredient Italian Sub Rolls!
EMAIL THIS RECIPE
Enter your email and I’ll send this directly to you.
Plus you’ll get new recipes from me every week!
Ingredients
- 1 ½ Cups Warm Water
- 2 tablespoon Instant Yeast
- 3 ½ teaspoon Sugar
- 1 ½ teaspoon Salt
- 3 ½ teaspoon Vegetable Oil
- 4 Cups All Purpose Flour
Instructions
- In a bowl, combine warm water, instant yeast, salt, sugar and vegetable oil. Give that a mix.
- Add in all purpose flour, mixing as you add it in, then mix until a rough, shaggy dough forms. Cover and let that sit for 15 minutes.
- Your dough should already be at least 50% bigger. Transfer to a counter and knead until a smooth dough ball forms. Divide into 4 pieces.
- Shape each piece into a ball then roll into a ~ 8 X 8 inch square (doesn't have to exact). Start rolling the square very tightly all the way down till you have a baguette like shape, then pinch the seams and sides to close and roll out to make them slightly longer.
- Transfer to a parchment lined baking sheet, brush with some water. Cover and allow to rise for 30 minutes. Once risen, brush with water one more time and add desired toppings.
- Bake at 375 F for 20-25 minutes or until fully golden. Remove, allow to cool fully and enjoy!
Nutrition
Want To Save This Recipe?
Share your email & we'll send it over! PLUS, you'll get new recipes from us weekly
Frequently Asked Questions
Yes, you can substitute active dry yeast for instant yeast in this Italian rolls recipe. However, you’ll need to proof it first by combining it with the warm water and sugar. Let it sit for about 5-10 minutes until foamy before proceeding with the rest of the recipe.
Absolutely! You can make these rolls up to 3 days in advance and store them in an airtight container. For longer storage, freeze them for up to 3 months. Just thaw and warm slightly before serving.
There could be a few reasons: your yeast might be old or expired, the water might have been too hot and killed the yeast, or your kitchen might be too cold. For best results, ensure your yeast is fresh and your water is around 105-110°F.
Yes! Bread flour will give your Italian sub rolls even more chewiness and structure. The higher protein content in bread flour creates a stronger gluten network, resulting in a chewier texture.
Properly baked Italian sub rolls should be golden brown on top and sound hollow when tapped on the bottom. If you have a baking thermometer, the internal temperature should read around 190-200°F.
Definitely! This Italian roll recipe is extremely versatile. Try adding 1-2 tablespoons of dried Italian herbs, ½ cup of grated Parmesan cheese, or even roasted garlic for flavored variations.
Phyl, in the comments mentioned, using a mister or spray bottle instead of a brush helps prevent deflating your risen dough. Spray lightly from a distance of about 6 inches for best results.
Made this a couple of times and it always hits the spot! Easy and yummy!
I’m so glad to hear it Lisa!
Made them several times, came out perfect each time. So quick and easy but most of all they are really delicious. Thanks Minoo
Delicious is definitely most important!! I’m so happy you loved the recipe Sue (:
Made these tonight for meatball sandwiches. Excellent recipe and so pleased with how light the bread was. Will definitely make them again and again. One tip I have is to use a mister for the water once they are risen. I brushed the water and deflated my loaves. Let them rise again and used a mister and they were perfect. Thanks for this wonderful recipe
Ouuu meatball sandwiches in an italian loaf sounds like a dream Phyl! And that is a great tip, I will use one next time as well if I have it on hand. I try to be very gentle with my loaves when brushing them haha. I’m glad you enjoyed (:
Delicious!
Made this for the first time tonight and my husband is begging me to make it again. Was so easy and delicious!!
Disappointed due to my mistake ~ Poor choice of covering for proof after forming rolls.
Will try this again, not covering for proofing, and will proof in warm, humid oven next time.
Time will tell. ????????
This recipe does all it’s supposed to do thus far… Ran into issues with the “cover and rise” for 30 minutes post-rolling and placing on parchment paper. I covered lightly with saran wrap, which was a disaster. Dough stuck and collapsed while removing.
I removed the wrap, and re-formed 8″ rolls and am now trying to re-proof them in a warm humid oven.
We’re hoping to save this batch… Will leave another comment with results after completed.
Also, note that these rolls proof best in a warm and humid environment. If your kitchen is cooler, proofing time will increase accordingly.
This is a great recipe! Simple and relatively quick to make. Delicious when I used them to make oven baked sandwiches. Thank you!