
You know those sad, pillowy buns in the grocery store bag labeled “Kaiser rolls”? Those are NOT Kaiser rolls. Let me show you what the real thing tastes like.
I’ve always been a sandwich girl. For years, I picked up those bagged buns from the grocery store without thinking twice. Then I tasted a REAL Kaiser roll, and I was genuinely shocked. I couldn’t believe they were passing off those soft, flavorless, preservative-packed buns as the real thing. So I set out to learn how to make them myself, and this Kaiser roll recipe is the result.
I BETTER NOT CATCH YOU buying Kaiser rolls from the store after you see how simple this is!
What Is a Kaiser Roll?
Jump to:
- What Is a Kaiser Roll?
- Why You’ll Love This Kaiser Roll Recipe
- Ingredients You’ll Need
- Equipment You’ll Need
- How to Shape Kaiser Rolls Without a Stamp
- Step-by-Step Instructions
- Topping Ideas
- Serving Suggestions
- Troubleshooting Your Kaiser Rolls
- Storage and Freezing
- More Bread Recipes You’ll Love
- Let’s Talk About That Grocery Store Bag One More Time
- Recipe Card
- Frequently Asked Questions
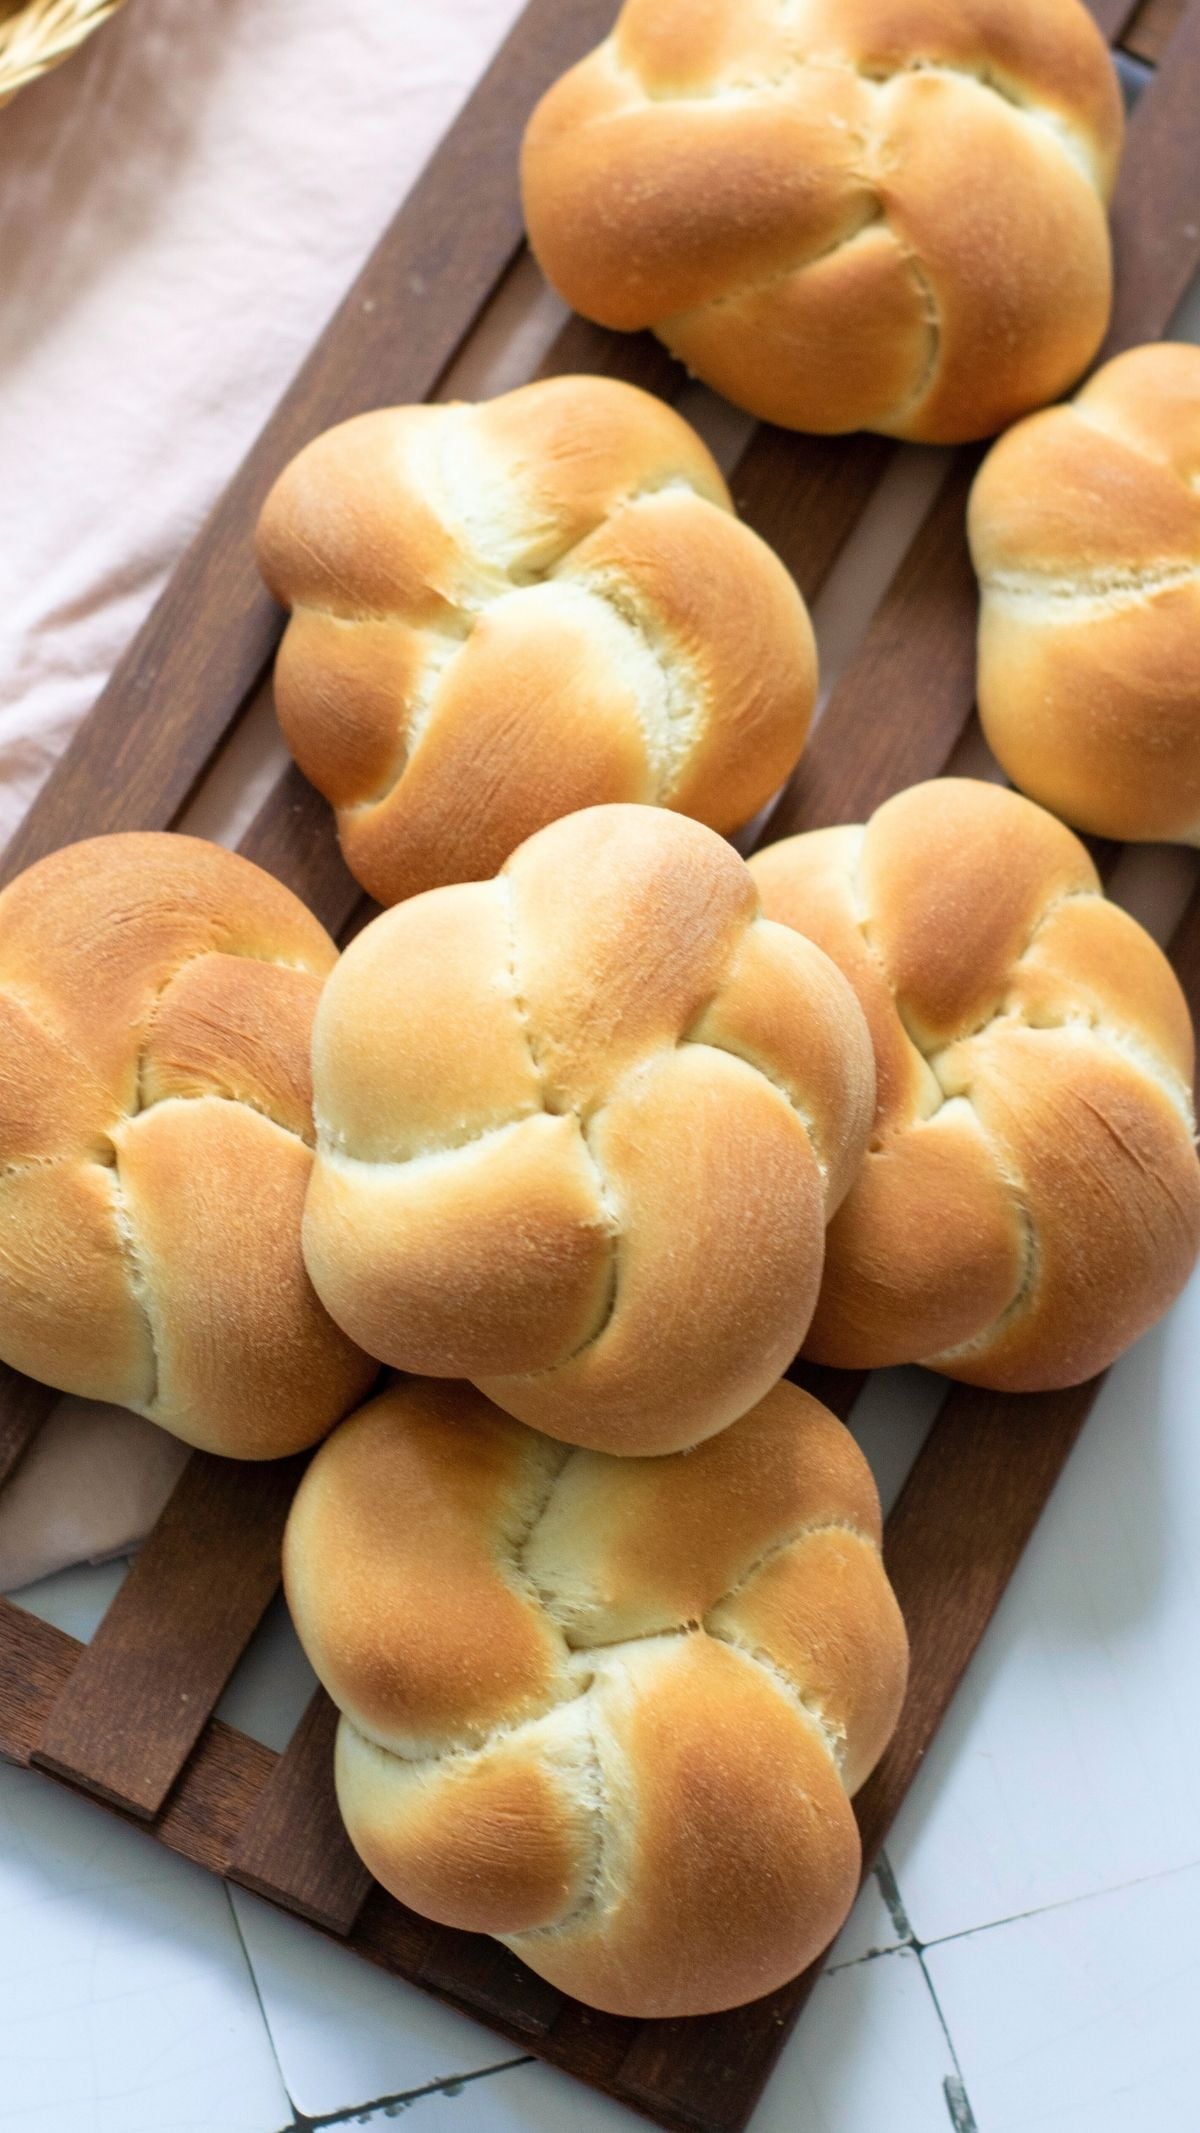
A Kaiser roll (also called a Kaiser bun or Kaiser bread) is a round, crusty roll that originated in Austria. The name comes from the German word for “emperor,” and these rolls were a staple in Viennese bakeries for centuries.
What makes a Kaiser roll distinct is its signature spiral or petal pattern on top, its slightly crispy exterior, and its soft, fluffy interior. They’re sturdier than a regular dinner roll, which makes them ideal for sandwiches and burgers.
Most people assume you need a special Kaiser roll stamp to get that iconic shape. You DON’T. This recipe uses a simple knotting technique that gives you that beautiful spiral without any special tools.
Why You’ll Love This Kaiser Roll Recipe
This is a beginner Kaiser roll recipe that doesn’t cut corners on flavor or texture.
The dough comes together with just 6 pantry staples, no stand mixer required. You’ll knead it by hand, shape it into knots (I walk you through every step), and bake it to a deep golden brown.
The result is soft and fluffy inside, with a crust that’s firm enough to hold up to any sandwich filling without going soggy. And yes, they WILL be a little firm straight out of the oven. Don’t panic. They soften beautifully as they cool.
The shaping takes a little practice, but once you get it, you’ll be making the most beautiful rolls of your life. I promise.
Ingredients You’ll Need

Dough:
1¼ cups warm water (110°F / 43°C): This activates the yeast. Too hot and you’ll kill it, too cold and it won’t wake up. Aim for water that feels comfortably warm on your wrist.
¼ cup granulated sugar: Feeds the yeast for a strong rise and adds a very subtle sweetness to the roll.
1½ teaspoons salt: Essential for flavor. Don’t skip it or reduce it.
1½ teaspoons instant yeast: I use instant yeast here because it’s reliable and doesn’t need to be proofed separately. If you only have active dry yeast, it’ll work, but add it to the warm water first and wait 5 minutes before continuing.
3½ tablespoons melted butter: Adds richness and that soft, tender crumb. For a dairy-free version, replace with an equal amount of vegetable oil.
4¼ cups all-purpose flour: The foundation of the dough. All-purpose flour works perfectly here. Measure by spooning into your measuring cup and leveling off, not by scooping directly from the bag, which packs in too much flour.
Minoo’s Pro Tip: Honey can replace the sugar 1:1 if that’s what you have on hand. It adds a subtle depth of flavor to the finished roll.
Equipment You’ll Need
No fancy tools needed for this Kaiser roll recipe. Here’s what you’ll use:
A large mixing bowl, a clean work surface for kneading, a kitchen scale (optional but helpful for dividing dough evenly at 85g per roll), parchment-lined baking sheets, and plastic wrap for covering the dough during rising.
That’s it. No stand mixer, no Kaiser roll stamp, no special pans.
How to Shape Kaiser Rolls Without a Stamp
This is the part that intimidates most beginners, but I want you to take a deep breath because it is SIMPLER than it looks.
Instead of using a Kaiser roll stamp, we’re using the knotting method. You roll each piece of dough into a rope, tie it into a loose knot, then tuck the tails to create that spiral shape on top.
The keyword is LOOSE. A tight knot won’t have room to expand during proofing and baking, and you’ll end up with a dense, misshapen roll. Keep it relaxed and let the dough do the work.
If your rolls unravel during baking, it means the ends weren’t pinched firmly enough underneath. Press those ends together with confidence at the bottom of the roll before placing them on the baking sheet.
Minoo’s Pro Tip: If the dough snaps back when you’re rolling it into ropes, cover it and let it rest another 5 minutes. The gluten needs time to relax before it stretches properly.
Step-by-Step Instructions
Step 1: Make the Dough Base
In a large bowl, combine 1¼ cups warm water, ¼ cup granulated sugar, 1½ teaspoons salt, and 1½ teaspoons instant yeast. Stir for about 30 seconds until the sugar and yeast dissolve completely. Add 3½ tablespoons melted butter and mix well.
Step 2: Add the Flour
Gradually add 4¼ cups all-purpose flour to the liquid mixture, stirring after each addition until a shaggy dough forms and pulls away from the sides of the bowl. It will look rough and messy at this stage. That’s exactly right.

Step 3: Knead the Dough
Transfer the dough to a clean, lightly floured work surface. Knead for 9 to 10 minutes until the dough becomes smooth and elastic. It will feel sticky at first, but resist adding too much extra flour. As you work it, it will come together into a soft, springy ball that bounces back when you press a finger into it.
Minoo’s Pro Tip: To test if your dough is ready, stretch a small piece between your fingers. If it stretches thin enough to be slightly translucent without tearing, your gluten is developed enough. This is called the windowpane test.

Step 4: First Rise
Place the dough back in the bowl and cover tightly with plastic wrap. Set it in a warm spot and let it rise for 1 hour, or until doubled in size. My favorite trick is to place the bowl in the oven with just the oven light on (do NOT turn the oven on). The warmth from the bulb creates a perfect rising environment.

Step 5: Divide and Pre-Shape
Punch down the risen dough and divide it into 10 equal portions, about 85g each if you’re using a kitchen scale. Roll each portion into a smooth ball by cupping your hand over the dough and rolling in tight circles on an unfloured surface. Cover the balls loosely with plastic wrap and let them rest for 8 to 10 minutes.
This rest period is important. It relaxes the gluten so the dough is easy to roll out in the next step.

Step 6: Roll into Ropes (First Pass)
Working with one ball at a time, roll each one into a rope about 6 inches (15 cm) long. Set the ropes aside while you finish the remaining balls. This brief rest while you work through all the portions gives the gluten more time to relax.

Step 7: Stretch the Ropes (Second Pass)
Once all the ropes have rested, go back to the first one and gently stretch and roll it until it reaches about 14 inches (36 cm) in length. The dough should now stretch easily without snapping back. Repeat with all remaining ropes.

Step 8: Shape the Kaiser Knots
Tie each rope into a loose single knot, leaving two tails extending from each side. Take one tail and bring it over the top and through the center hole of the knot. Bring the other tail down and tuck it underneath the roll. Pinch both ends firmly together on the bottom to secure. The knot should look defined but relaxed, not tight.
Minoo’s Pro Tip: Don’t worry if your first few aren’t perfect. Even imperfect Kaiser rolls taste incredible. The shaping gets easier with every single one you make.

Step 9: Second Rise (Proofing)
Place the shaped rolls on parchment-lined baking sheets, spacing them at least 3 inches apart. Cover loosely with plastic wrap and proof for 1 to 1½ hours until puffy and nearly doubled in size.
Don’t rush this step. Underproofed rolls will be dense and won’t have that light, airy interior that makes a Kaiser bun worth making.

Step 10: Bake
Preheat your oven to 350°F (180°C). Bake for 26 to 30 minutes until the rolls are deep golden brown on both the top and bottom, rotating the pan halfway through for even browning.
The rolls may feel slightly firm when they first come out of the oven. This is normal. They soften as they cool.

Step 11: Cool
Transfer the baked rolls to a wire rack and cool for at least 10 minutes before slicing. I know it’s tempting to cut into them immediately, but letting them rest gives the interior crumb a chance to set properly.

Topping Ideas
One of the best things about this Kaiser roll recipe is how versatile the toppings are. Before the second rise, brush the tops lightly with water or a beaten egg, then sprinkle on your choice of:
Sesame seeds, poppy seeds, everything bagel seasoning, dried minced onion, flaky sea salt, shredded Parmesan cheese, or leave them completely plain. All of these work beautifully.
For a soft, shiny crust, brush the rolls with melted butter immediately after pulling them from the oven. This is especially nice if you’re using them for sandwiches.
Serving Suggestions

These Kaiser buns are built for sandwiches. The structure holds up to hearty fillings without falling apart. Here are some of my favorite ways to use them:
Deli-style sandwiches with cold cuts, sliced cheese, mustard, and pickles are the CLASSIC choice. There’s a reason this is the traditional way to eat a Kaiser roll.
They also make outstanding burger buns. The roll is sturdy enough to handle a juicy patty and all the toppings without getting soggy. If you love homemade burger situations, my Quick Hamburger Buns are another great option when you’re short on time.
Breakfast sandwiches are incredible on these rolls. Slice, toast lightly, and layer with eggs, cheese, and your choice of protein.
Serve them warm alongside soup or stew for a satisfying weeknight dinner. They’re also wonderful split and spread with butter and jam.
Troubleshooting Your Kaiser Rolls
My rolls came out dense. This is almost always caused by one of three things: the dough wasn’t kneaded long enough, the rolls were underproofed during the second rise, or too much flour was added to the dough. Next time, knead the full 9 to 10 minutes, wait until the rolls are VISIBLY puffy before baking, and measure your flour carefully.
My rolls smell too yeasty. This is a sign of over-fermentation. The dough rose for too long, especially in a warm environment. Watch the dough rather than the clock. You want it doubled, not more than doubled.
The knots unraveled during baking. The ends weren’t pinched firmly enough on the bottom. Next time, press them together with real intention before placing on the baking sheet.
The dough kept snapping back when I tried to roll the ropes. The gluten needed more rest time. Cover the ropes for an additional 5 minutes before stretching.
The tops aren’t browning evenly. Rotate the pan at the halfway mark. Oven hot spots are real, and rotating makes a big difference in even browning.
Minoo’s Pro Tip: A kitchen scale is your best friend for this recipe. Dividing dough by weight at 85g per portion ensures all your rolls are the same size and bake evenly.
Storage and Freezing

Room temperature: Store cooled rolls in an airtight container for up to 3 days. They stay soft and fresh without any special treatment.
Freezer: Place cooled rolls in a freezer bag for up to 3 months. To reheat, place frozen rolls directly into a 350°F oven for 5 minutes. No thawing needed. They come out tasting freshly baked.
This make-ahead freezer option is one of my favorite things about this Kaiser roll recipe. I’ll bake a full batch on the weekend and pull them out throughout the week whenever I need a sandwich situation handled FAST.
More Bread Recipes You’ll Love
If this Kaiser roll recipe has you in a bread-baking mood (it always does that to me), here are some recipes from the blog you’ll want to try next:
- Italian Sub Rolls - Another sturdy sandwich roll with a beautiful crust. Perfect for loaded subs and hoagies.
- Artisanal Bread Rolls - Four ingredients, no complex shaping, and that dreamy bakery-style crust.
- Easy Dinner Rolls - Soft, buttery, and impossibly fluffy. The crowd-pleaser for any dinner table.
- Pretzel Rolls - If you love that chewy, salty pretzel exterior on a soft roll, these are calling your name.
- Quick Hamburger Buns - Need sandwich buns in 30 minutes? This is your recipe.
- French Baguettes - Four ingredients, incredibly crispy crust, and a soft open crumb. A classic.
Let’s Talk About That Grocery Store Bag One More Time

I want you to go to your grocery store, pick up one of those bags of “Kaiser rolls,” read the ingredient list, and then come back here and make THIS recipe instead.
Real Kaiser rolls have six ingredients. Six. That’s it.
Once you taste the difference between a homemade Kaiser bun and that bagged version, there’s no going back. Your sandwiches deserve better. You deserve better.
Give this Kaiser roll recipe a try this weekend and leave a comment below telling me how it went! Did you top yours with sesame seeds, poppy seeds, or everything bagel seasoning? I want to know. And if you’re feeling proud of your rolls, tag me in your photos. You’ve GOT this!
Recipe Card

The Best Kaiser Roll Recipe for Beginners
EMAIL THIS RECIPE
Enter your email and I’ll send this directly to you.
Plus you’ll get new recipes from me every week!
Ingredients
- 1¼ cups warm water 110°F/43°C
- ¼ cup granulated sugar or ⅙ cup
- 1½ teaspoons salt
- 1½ teaspoons instant yeast
- 3½ tablespoons melted butter or oil
- 4¼ cups all-purpose flour
Instructions
- In a large bowl, combine 1¼ cups warm water, ¼ cup sugar, 1½ teaspoons salt, and 1½ teaspoons instant yeast. Stir until the sugar and yeast dissolve completely, then add 3½ tablespoons melted butter and mix well.
- Gradually add 4¼ cups flour to the liquid mixture, stirring until a shaggy dough forms and pulls away from the sides of the bowl.
- Transfer dough to a clean, lightly floured work surface and knead for 9-10 minutes until smooth and elastic. The dough will feel sticky at first but will become smooth and springy as you work it.
- Place the dough back in the bowl, cover tightly with plastic wrap, and let rise in a warm spot for 1 hour or until doubled in size.
- Punch down the risen dough and divide into 10 equal portions, about 85g each. Roll each portion into a smooth ball, cover loosely, and let rest for 8-10 minutes to relax the gluten.
- Working with one ball at a time, roll into a rope about 6 inches (15 cm) long. Let the ropes rest while you shape the remaining balls.
- Once all ropes have rested, gently stretch and roll each one until it reaches about 14 inches (36 cm) in length. Tie each rope into a loose single knot, leaving two tails extending from each side.
- Take one tail and bring it over the top and through the center hole of the knot. Bring the other tail down and tuck it underneath the roll, pinching both ends firmly together on the bottom to secure. The knot should look defined but not tight.
- Place shaped rolls on parchment-lined baking sheets, spacing them at least 3 inches apart. Cover loosely with plastic wrap and proof for 1 to 1½ hours until puffy and nearly doubled.
- Preheat oven to 350°F (180°C). Bake for 26-30 minutes until deep golden brown on the top and bottom, rotating the pan halfway through for even browning.
- Transfer to a wire rack and cool for at least 10 minutes before slicing.
Notes
Nutrition
Want To Save This Recipe?
Share your email & we'll send it over! PLUS, you'll get new recipes from us weekly
Frequently Asked Questions
A Kaiser roll has a distinctive spiral or petal pattern on top, a slightly crispy crust, and a soft, airy interior. The structure is firmer than a dinner roll, which makes it ideal for sandwiches. The shape traditionally comes from a stamp or folding technique, but a knotting method works just as well.
No. This recipe uses a knotting technique that creates a beautiful spiral shape without any special equipment. Once you practice it a few times, it becomes very natural.
Dense rolls usually come from too little kneading, not enough proofing time, or too much flour in the dough. Knead the full 9 to 10 minutes, wait until the rolls are visibly puffy before baking, and measure your flour by spooning into the cup rather than scooping.
Absolutely. This recipe is designed for hand kneading. Knead the dough on a lightly floured surface for a full 9 to 10 minutes and you’ll be fine.
Yes. Dissolve active dry yeast in the warm water and let it sit for 5 minutes before adding the remaining ingredients. Everything else stays the same.
I recommend freezing the baked rolls rather than the raw dough for the most reliable results. Bake, cool completely, freeze in a bag, and reheat at 350°F for 5 minutes straight from frozen.
Sesame seeds, poppy seeds, everything bagel seasoning, and dried minced onion are all classic choices. Brush the tops with water or egg wash before adding toppings so they stick during baking.
Yes! They’re sturdy enough to hold a juicy patty and all the toppings without falling apart. They make excellent burger buns.
This is completely normal. Kaiser rolls firm up slightly during baking and soften as they cool. Give them at least 10 minutes on the wire rack before slicing.
Stored in an airtight container at room temperature, they stay fresh for up to 3 days. For longer storage, freeze for up to 3 months.